If for you, like me, (nearly) a whole summer of warm weather and sunshine means an excuse to be in the kitchen experimenting with ice cream flavours, then no doubt you’ll end up with lots of leftover egg whites. Don’t throw them away – freeze in small plastic bags, labelled with the number of whites, then simply defrost as needed for your recipes (or keep in the fridge for up to a week). I remember once reading Nigella Lawson saying she sometimes separates eggs directly over the sink so she doesn't have the stress of figuring out what to do with all the leftover whites. Nigella, this one is for you.
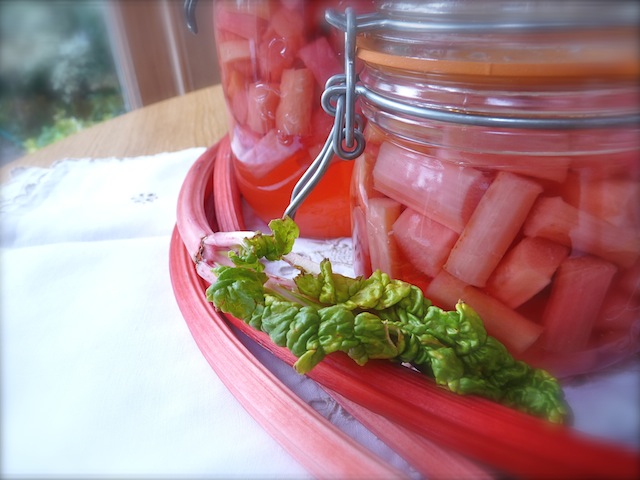
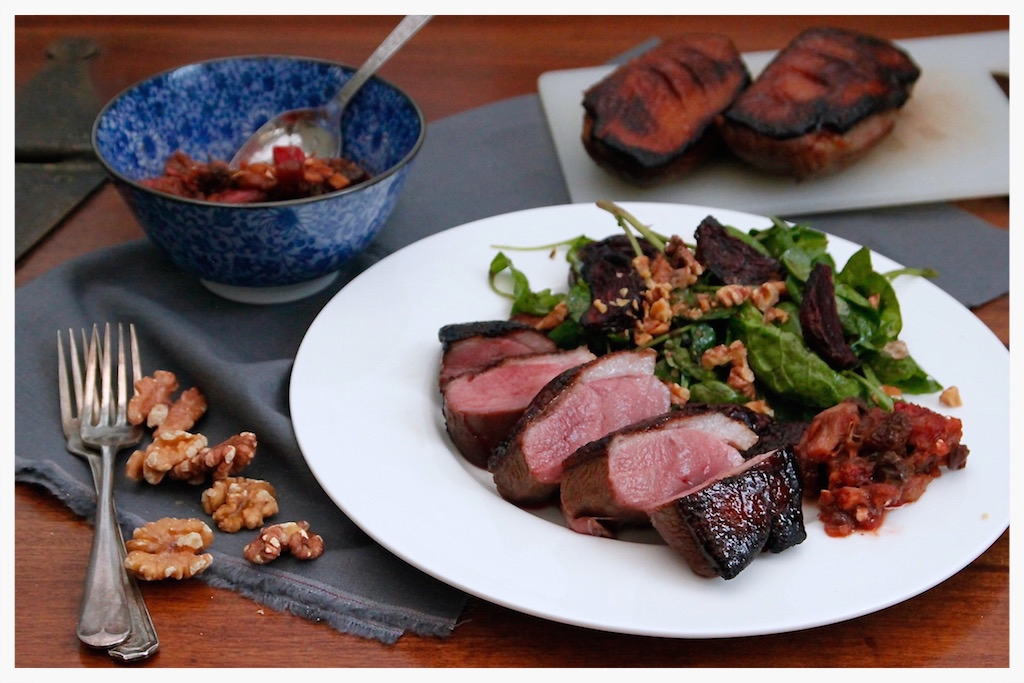
Read moreWhisky and maple smoked duck with beetroot & walnut salad and quick rhubarb chutney
There’s something rather magical about the pleasing and versatile word ‘glaze’. To coat porous pottery in a thick, impenetrable gloss that survives the trial-by-fire of the kiln is to glaze, combining aesthetics and ergonomics. To have one’s eyes glaze over suggests thoughts have slipped blissfully into the realm of reverie. Double-glazed windows reassure, promising warmth and comfort. Finally, there is my favourite, edible sense: to glaze food is to paint it with slick, concentrated flavour, to make it shine like a pot fresh from a kiln. It makes it glossy, inviting, shimmering with promise: think of a bountiful berry tart, multicoloured fruits nestling in a pillowy bed of pastry cream, their tops brushed and glinting with a sweet glaze of molten apricot jam; or a roast aubergine, its flesh collapsed into silken softness, smothered in a dark, umami-rich miso glaze.
Read moreRhubarb, strawberry and coconut breakfast crumble

There are many benefits to cooking with coconut oil. It’s full of good fats, nutritious, it can replace dairy in many recipes, it has a pleasant slightly sweet coconut flavour…but, if I’m perfectly honest with you, one of the main reasons I love this new trendy ingredient is because you can melt it in the microwave without it exploding everywhere, as butter has a tendency to do. Who hasn’t felt their heart sink as that sickening ‘pop’ breaks the monotony of the whirring, grinding microwave, knowing the next few minutes will be spent painstakingly wiping a greasy yellow film off the hot plastic, the air heavy with the slightly sickly scent of warm animal fat? Who hasn’t opted for the microwave to melt their butter, out of laziness and not wishing to wash up a pan, only to end up spending those valuable saved minutes scraping away smears of grease? (You can, of course, avoid this problem by covering your bowl or jug with cling film while microwaving, but for some reason I take the chance every time…I think I just like to live on the edge).
Read moreTurkish-style lamb meatballs with sweet-sour rhubarb sauce

Help! There's a giant triffid in my garden! It has monstrous pink tentacles that fumble wildly from the earth, stretching towards the skies, and huge, grasping, green hands the size of dustbin lids, threatening to engulf and consume everything they touch. Every time I look it has grown, violently thrusting more of those rigid spears from the ground, one step closer on its mission to take over the world. Its proliferating legs creak stiffly in the breeze, like those of a spider with rigor mortis, threatening destruction. Its leafy clutches will soon start to block out the sun, throwing the planet into a state of black oblivion. We are doomed.
Read moreCinnamon cranberry porridge with rhubarb, blood orange and raspberries

It’s rhubarb season, and I feel like an excitable little girl with a penchant for Disney and ponies every time I take a tray of the stuff out of the oven, its radiant fuschia guaranteed to perk up even the lowest of spirits, even if only for a moment. While you can bury this delicious sweet-tart vegetable under a blanket of pastry or a smothering of crumble, it seems a shame to hide it when it’s so beautiful. There’s a reason rhubarb at this time of year is called ‘champagne rhubarb’: it’s far superior to the summer stalks in colour, flavour and texture. It makes sense, then, to show it off.
Read moreFive things I love this week #8

1. Making my own marmalade.
I grew up around this process; my mum used to make her own every year, but since it started gathering dust in the larder because no one in our family eats toast any more, she has sadly stopped. I decided to pick up the orange baton and initiate myself in the mysterious world of the magical seville after spotting crates of them at the market a couple of weeks ago. I've made twenty jars since then, trying two different recipes. The first was a Waitrose recipe that infuses the marmalade with herbs - I used bay and rosemary. The oranges are simmered whole in water until totally soft, then the flesh scooped out and the peel shredded before the whole lot is simmered again with sugar until it sets. This is pretty easy and can be made in an evening, although I didn't slice the peel finely enough so it was chunkier than I'd have liked. The herb flavour didn't come through as much as I'd like, so I might use more rosemary next time, as it's so good with oranges.
Read moreRhubarb, strawberry and Cornish gin cobbler

There’s an obvious answer to the question ‘Why don’t people cook with gin much?’
The answer is, of course, thus: because why on earth would you want to cook with gin when instead you could do all of the following things with it, preferably in the following order:
1. Admire beautiful simplicity of bottle of gin.
2. Feel small thrill of excitement at the promise contained within said bottle’s glassy depths
3. Wonder if it is the right time of day to drink gin
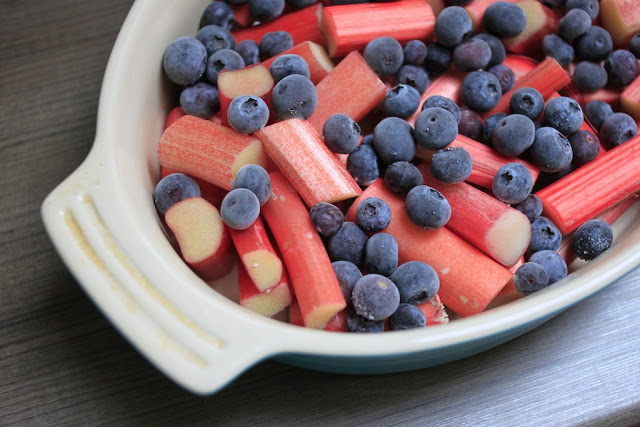
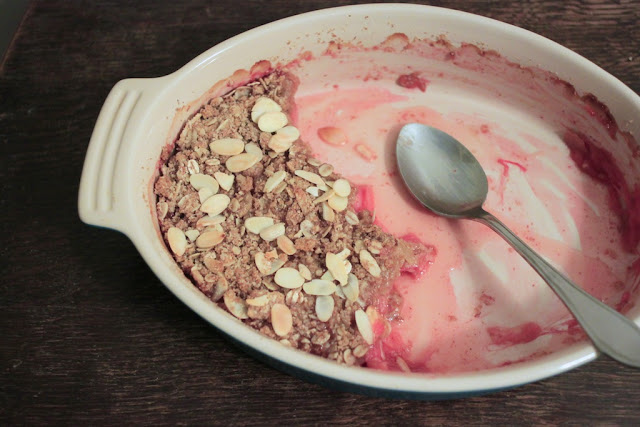
Read moreRhubarb, blueberry, almond and cardamom breakfast oat crumble

Oops, I did it again. Having told myself I was going to completely cease hoarding various fruits in my freezer, and just eat things seasonally without worrying about storing them up for a period of dearth (it's not like we still live in medieval times, where pretty much nothing is harvestable between winter and spring), I found myself handing over the best part of a tenner at the market yesterday for a huge armful of hot pink rhubarb stalks. They were just so pretty, and it was the only stall still selling the lovely slender, pastel pink type, rather than the thicker, more purple-green woody stuff. I told myself it was the last time, but I bet if I see it again next weekend I buy some more.
Fortunately, I bought it at the weekend, and the weekend means brunch. Even though I live on my own, I still bother to cook brunch just for myself. It's a nice way to differentiate the weekend from the more monotonous weekdays, and I have to admit there are few things I enjoy more than sitting down on my own to a big bowl of brunch, a large mug of green tea and Masterchef on my iPad. Plus, while it's in the oven, I find myself doing useful tasks like laundry, tidying and writing blog posts. What a mad crazy weekend life I lead.
I'm not mad enough, though, to faff around cooking something like pancakes just for me. But a big dish of some kind of baked oatmeal is perfect, because you can make it at the weekend then eat the rest during the week - it microwaves well. One of my favourite rhubarb dishes is this blueberry and rhubarb baked oatmeal, where a delicious chewy and crunchy layer of oats, berries and milk bakes over a juicy layer of rhubarb. I'm also a big fan of this rather less fiddly pear and gooseberry oat crumble, which is incredibly easy and just requires mixing an oat mixture with some fruit, then baking for an hour.
One day I decided to try the aforementioned pear and gooseberry recipe with rhubarb. The recipe works because the pears and gooseberries release a lot of juice during the cooking process, which soaks into the oats from below and makes them beautifully chewy and gooey. Rhubarb, too, turns very juicy in the oven, as do blueberries. It seemed like something that had to be done.
I threw in some crushed cardamom with the rhubarb, a pairing which I have loved for a long time - the exotic citrus fragrance of cardamom works beautifully with sweet rhubarb and blueberries. Into the oat mixture I stirred some ground ginger and cinnamon, warming spices that just seem made to go with oats. To moisten the oat mixture, a delicious medley of maple syrup, olive oil, vanilla extract, and a splash of water. I use a beautiful mandarin-infused olive oil, which you can find here if you're interested - it has the most wonderful deep, orange flavour which survives the cooking process to leave a beautiful hint of citrus in each mouthful, a fantastic combination with the cardamom and warming spices.
You may think that breakfast is not the time to be messing around with cardamom, mandarin-infused olive oil, cinnamon and ginger. I think you'd be wrong. Brunch is exactly that: a time to make something a little bit more exciting for breakfast, to treat yourself. Plus, this is hardly a chore - it comes together in minutes and then sits patiently in the oven for just under an hour, leaving you to get on with other things.
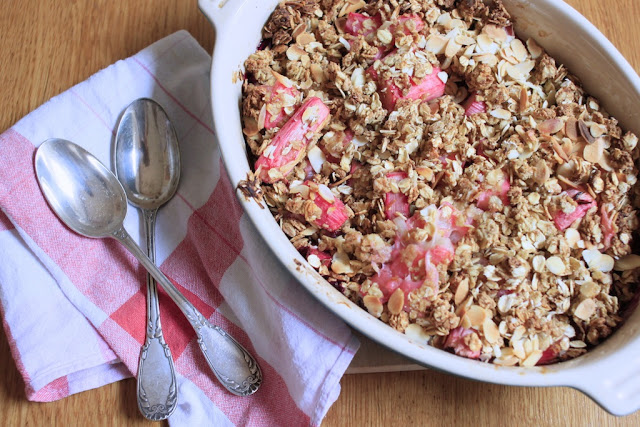
Oh, and I haven't yet mentioned - it's delicious. It's like eating crumble for breakfast, as the name suggests, which is pretty much living the dream. You have a beautiful gooey mixture of rhubarb and blueberries, dark and inky purple, sweetened with caramel-scented honey and citrussy cardamom. You have a scattering of oats, crispy and crunchy on top, gooey and sticky underneath where they've absorbed the juice from the fruit, warm from cinnamon and ginger and with a hint of orange and vanilla. The contrast in textures is delicious, and the balance of the warm toasty oats and sharp, juicy fruit.
It feels like a pretty decadent breakfast, but it's actually not bad for you at all. It's even vegan (if you swap the honey for some caster sugar), so hopefully any vegan readers out there will find that exciting. And, I imagine, you could make it gluten-free if you used gluten-free oats and a gluten-free substitute for the spelt flour - buckwheat flour, for example.

Make this for your friends, or make it for just yourself. Either way, I promise you'll be impressed. If you're as big a fan of crumble as I am (and if you're not, why are you reading this blog?!), you will hopefully enjoy the slightly risqué excitement of indulging in it for breakfast (is that a bit tragic? I think it might be, but never mind). It's also one of the prettiest breakfasts you will probably ever make. And, if you have leftovers, they microwave very well - I normally put them in a bowl and microwave for 2 to 2 and a half minutes on full power. Leftovers are fairly unlikely, though - it takes me a huge amount of discipline not to eat the entire dish of this in one sitting (and I promise you, I could, easily).
I can think of few better ways to welcome the weekend than with a beautiful vibrant bowl of sticky, pink-purple, spice-scented crumble.

Rhubarb, blueberry, almond and cardamom breakfast oat crumble (serves 2-3):
- 400g rhubarb, trimmed and cut into 2-inch lengths
- 150g blueberries
- 3-4 tbsp honey, depending on the sourness of your rhubarb
- 6 cardamom pods, seeds crushed to a powder
- 150g jumbo oats
- 40g spelt flour
- 1/4 tsp salt
- 1 tsp ground ginger
- 1/2 tsp ground cinnamon
- 3 tbsp olive oil (I use mandarin-infused oil)
- 3 tbsp maple syrup
- 1 tsp vanilla extract
- 2 tbsp water
- 3 tbsp flaked almonds
- Maple syrup, to serve (optional)
Pre-heat the oven to 190C.
Scatter the rhubarb and blueberries over the bottom of a baking dish (a 20cm square one is good, or a similar capacity oval one like mine). Drizzle over the honey and sprinkle over the cardamom, then toss together with a spoon.
In a small bowl, mix together the oats, flour, salt, ginger and cinnamon. In a small jug, whisk together the olive oil, maple syrup, vanilla extract and water. Pour this into the oats then mix together until combined. Sprinkle this mixture over the rhubarb then mix gently, keeping most of the oats on top of the fruit. Scatter over the almonds.
Bake for 50 minutes, until the oats are toasted and crunchy and the fruit juicy. Check it halfway through and if it looks a bit dry, sprinkle over a little water. Leave to cool for five minutes once out of the oven, then serve, with maple syrup if you like.

Rhubarb, vanilla and cardamom jam

Sometimes, I feel like vanilla gets a little overlooked in my kitchen. That's not to say I don't use it often; a teaspoon or two of golden vanilla extract regularly makes its way into my baking and even sometimes into my breakfast. But it's always there as a background to other things, a pleasantly sweet, bland, blank canvas to be painted over in vivid stripes by other flavours. It's so easy just to tip vanilla extract out of the bottle without thinking about it, without really enjoying its heady (there's more than a little alcohol in there) perfume, to just let it blend in. You get a totally different experience using vanilla pods.

Opening a thin glass jar of vanilla pods is a wonderful thing. First, there's the incredible aroma that hits you like a powerful blast of sweet air as you take off the lid. Then there's the feel of the pods - slightly moist, almost silky, damp with flavour and perfume. I always find it odd how something ostensibly so gnarled, black and ugly can produce the flavour we associate with everything light, white and aesthetically pleasing - think vanilla ice cream or vanilla cheesecake.
Then there are those beautiful little seeds, tiny capsules of flavour that should look so wrong peppering a dish like dust, but instead are pleasing to the eye, promising an abundance of sweet vanilla goodness. I hate recipes that tell me to scrape the seeds from a vanilla pod and add to something, because inevitably some seeds always get lost in the process - they stick to the knife, or the bowl, or the spatula, or you just can't get them all out of the pod.

Still, I also like that you can recycle vanilla pods. After infusing things with them (ice cream, jam, etc.) I give the pod a quick rinse, let it dry on some kitchen paper, and then stick it in a jar of caster sugar, where it infuses the sugar wonderfully with its scent. Our vanilla sugar jar at home now has a total of five pods twisting up out of the mound of sugar - that's got to be some potent stuff. While vanilla pods aren't cheap, they're certainly good value. And while a good brand of vanilla extract (or vanilla paste, which is my new love - it contains all the seeds as well, in a viscous, treacle-like black goo) is perfectly fine for most things, you sometimes can't beat a vanilla pod in the kitchen.
This jam is one example. While I used to think ginger and orange were the best things in the world to pair with rhubarb, this jam changed my mind. There is something about the combination of rhubarb, sugar and vanilla that is just incredible. I think it's the intense sweetness of it, reminiscent of childhood desserts and sweets from the corner shop. Combine the fragrance of vanilla with the tart sugary hit of rhubarb, and you have something utterly wonderful.

This jam arose as a way of using up six bags of rhubarb from my freezer, but I've made it again since with specially purchased rhubarb, because it's just so good. The rhubarb and sugar cook down into a rather unassuming brownish pink mass, flecked with those all-important vanilla seeds, but it is definitely one of those things that tastes better than it looks. Spread on toast, where it becomes a lovely dusky pink colour, it's the ultimate sweet morning pick-me-up.
I've also added cardamom, which I have to say was a bit of an inspired idea. Cardamom works well with rhubarb, lending it a delicious citrus note, but the combination with the vanilla as well is ridiculously good. There's tartness from the fruit, sweetness from the sugar, fragrant perfume from the vanilla, and an alluring exotic citrus note from the cardamom that is reminiscent of those beautiful syrupy sweet Middle Eastern desserts.
This is a very special jam indeed, yet one that hardly takes any effort; in fact, it's more effort to sterilise the jars to put it in than it is to make the jam. A fine use for the special vanilla pod, as well as one of England's most neglected vegetables.

Rhubarb, vanilla and cardamom jam (makes 5 jars):
- 1kg rhubarb (weighed after trimming)
- 1kg jam sugar
- 1 vanilla pod, split lengthways
- 12 cardamom pods, seeds removed and crushed to a powder
- Juice of 1 lemon
Chop the rhubarb into 3cm pieces and put in a large, heavy-based saucepan or preserving pan. Add the sugar and vanilla pod, and heat gently until the rhubarb starts to turn juicy and the sugar starts to dissolve. Put a small plate in the freezer (to test for when the jam is set). Add the cardamom and lemon juice to the rhubarb, then turn the heat up and let it bubble quite vigorously for 30 mins-1 hour. Stir occasionally to prevent the rhubarb and sugar catching on the bottom of the pan and burning - this happens if the heat is too high.
Meanwhile, sterilise your jars and lids. I do this by washing them well in soapy water, then putting the jars upside down in an oven at 120C for 40 minutes, adding the lids (also upside down) for the last 10 minutes. Turn the oven off and leave the jars inside until ready to bottle the jam.
To test for a set, put a teaspoon of jam onto the cold plate from the freezer and leave for 2 minutes. If you can run your finger through it and it wrinkles and separates, it's ready. If not, let it bubble for a bit longer.
When the jam is set and still hot, ladle through a clean funnel into the jars, add wax discs and put on the lids. Voilà!

Rhubarb and ginger brack

I used to make myself a tea loaf every few days when I was in my second and third year of university. I remember this very distinctly. I can remember the exact spot on my bookshelves in my room where I would keep the polka-dot Emma Bridgewater cake tin (a present - I can never afford that sort of stuff normally). I can remember my daily afternoon ritual: returning from the Bodleian to have lunch, then working in my room for the rest of the day, occasionally getting distracted by people-watching through my gigantic bay window that looked out onto a busy thoroughfare (sometimes I'd see a friend frantically waving up at me). Around four o'clock, I'd make myself a big mug of tea, slice a thick slab of tea loaf, lick the sugary residue off my fingers after transporting it to a plate, and sit down, settled, a fork in hand.

There I would sit, sun streaming in through the window, books piled up around my laptop, tea steaming, the faint sound of voices and laughter emanating from the street outside. Mouthful after sugary mouthful, the tea loaf would disappear in a haze of sweet stickiness, and I would feel revived, ready to carry on with Marvell or Richardson or Defoe or whatever else I had to set my mind to that afternoon.
Sometimes it was banana bread, when I had bananas to use up, but often I'd make various variations on the theme of a tea loaf. Tea loaves are, to me, a quintessentially British bit of baking. They involve steeping dried fruit in strong tea for several hours (or overnight), before mixing this fruit and tea medley with flour and eggs; sometimes a little sugar (not much is needed as the fruit is so sweet), sometimes ground almonds to add moisture; sometimes a pinch of warming spice. The main point is that there is no fat added: the tea-soaked fruit makes the cake perfectly moist and gooey without the need for butter or oil. Thus, the beauty of the tea loaf: good for those watching their waistline.

I wasn't, incidentally, but few things can perk up the academic brain more than a slice of cake packed with dried fruit. I used to use apricots, figs, prunes, dates and sultanas. My favourite mouthfuls were those featuring the dates, which turned gloriously sticky and toffee-like during the baking process. Sometimes I added almonds, for a little crunch, or steeped the fruit in orange juice instead of tea.
I love the magic that happens when you soak dried fruit. Used to eating it raw, or throwing it raw into things like cakes and breads, I forget how deliciously plump and juicy it becomes after a nice hot bath. The saturated fruit makes the cake all the more moist, sticky and gooey. It's kind of how a fruit cake should be - I always find those fruit cakes we make on festive occasions, like Christmas cake or simnel cake, far too dry.
There's something intensely comforting about a tea loaf. It's solid and robust, a good, proper, old-fashioned cake. It often has a lovely crunchy crust around the outside, while the inside is gloriously moist and gooey from all the fruit. The fruit is plump and sweet, having absorbed the tea or juice, while the cake itself is fluffy, often with a hint of spice. It's the kind of thing you eat when you are feeling a bit sad, or a bit tired, or a bit peckish. I can't think of something better to revive you in the afternoon. Also, because it's lower on sugar than most cakes, it doesn't give you a horrible sugar crash when you come back down to earth - the dried fruit is good, honest, slow-release energy. At least I feel it is; I'm no nutritionist.
You can eat a tea loaf spread with a little butter, but when it's fresh from the oven it needs no accompaniment other than tea. The smell as it bakes, filling your kitchen with homely, warming aromas, is - for me - what baking is all about.

This recipe is inspired by my recent trip to the Wakefield Rhubarb Festival. There I bought a delicious rhubarb and ginger 'brack', an Irish name for a sweet, fruited bread that is now often used to denote a tea loaf. I gave it to my mum for Mother's Day, and it only recently emerged from the freezer, allowing me to finally have a taste. It's delicious - quite a dense cake, with wonderfully gingery, sweet sultanas and sticky chunks of rhubarb. The sort of thing you could almost justify having for breakfast. It feels wholesome, somehow, robust and earthy and inviting.
Inspired by a few mouthfuls of this, I decided to have a go at creating my own. Having never made a rhubarb tea loaf before, I experimented, basing my recipe on a few others I'd come across online and the taste and texture of the brack I had bought. I was a little worried it wouldn't work, but it did - beautifully.

I soaked a mixture of raisins, finely chopped crystallized ginger and finely chopped rhubarb in strong Earl Grey tea overnight (part of me wanted to use Yorkshire tea, given the provenance of rhubarb and where I live, but I thought Earl Grey would add a lovely floral fragrance). In the morning, the raisins were plump and the ginger had perfumed the whole thing with its sharp, hot scent. To this mixture I added an egg and a little brown sugar, then folded the whole lot into flour, baking powder, ground almonds, a hefty amount of ground ginger and a little cinnamon. I wanted the whole thing to be really gingery - I almost considered adding some stem ginger syrup as well, but restrained myself. The batter was the perfect consistency (I worried I'd put in too much tea, and the rhubarb would be watery) as I spooned it all into a lined loaf tin.
This honestly is one of the easiest cakes you could ever make. I whipped it up in the time it took me to make a cup of tea to go with my breakfast. You only need a couple of bowls and spoons, and a loaf tin. And an oven, of course. I really love how simple and homely it is - just a few ingredients, no fancy techniques (not even a whisk needed), and the result is a beautiful old-fashioned loaf.

And the taste? Fantastic. It's incredibly gingery, fiery bursts of crystallised ginger peppering the dense, moist crumb. This, though, is tempered by the gooey pieces of rhubarb throughout, and the sweet, plump raisins. I actually think it's better than the brack I bought from the festival! Although tea loaves have a tendency to be quite dense, the juicy rhubarb in this really lightens it, while still making it seem indulgent. You could serve it as a pudding after a light meal, with some ice cream, or have it for breakfast spread with butter. I ate it still warm from the oven, unable to believe that my spontaneous experiment had worked out quite so well.
If you're a rhubarb fan, or a ginger fan, I'd urge you to try this. It's unlike any other rhubarb or ginger cake I've tasted, and perfect for lovers of very gingery cakes. For such a simple recipe, it's immensely rewarding. And, even better, it's low-fat - but you wouldn't guess.

Rhubarb and ginger brack (makes 1 loaf):
- 300ml strong, hot tea (I used Earl Grey)
- 100g raisins or sultanas
- 150g finely diced rhubarb
- 50g crystallised ginger, finely chopped
- 200g plain, wholemeal or spelt flour
- 50g ground almonds
- 2 tsp baking powder
- 1 1/2 tsp ground ginger
- 1/2 tsp ground cinnamon
- 1 egg
- 75g light brown sugar
- 2 tbsp demerara sugar, for sprinkling (optional)
Soak the raisins, rhubarb and crystallised ginger in the tea overnight.
When ready to bake, pre-heat the oven to 170C. Grease and line a loaf tin with baking parchment. In a large bowl, mix together the flour, almonds, baking powder, ginger and cinnamon. To the tea and fruit mixture, add the egg and sugar and stir together. Pour the fruit mixture into the flour mixture, and mix with a large spoon or spatula until evenly combined.
Pour the mixture into the loaf tin, then sprinkle with the demerara sugar, if using. Bake for 55 minutes, until the top of the loaf is crusty and golden, but still gives slightly in the middle when pressed. Leave to cool a little before slicing and serving. It's also very good the next day spread with butter, and freezes well.
Rhubarb vodka

A few weeks ago, I got up on a cold, grey, quintessentially northern morning and made my way to the Wakefield Rhubarb Festival. Before I moved to York, I always looked forward to late-winter trips to my parents' house in the Dales, because they would furnish me with plentiful heaps of gorgeous, hot pink Yorkshire rhubarb from the grocer's around the corner. Now that I'm living so close to that romantic and mysterious-sounding thing, the 'Rhubarb Triangle', it seemed rude not to get on a train and visit the heart of rhubarb country for a celebration of all things to do with this beautiful ingredient.
Any rhubarb connoisseur can tell you that Yorkshire rhubarb is the finest in the world - why they bother importing stuff from Holland later in the year is a mystery to me, as it's never the same. Early season rhubarb is a sight for sore, winter-jaded eyes and souls. Unless you're the world's worst scrooge, I fail to see how it couldn't cheer you up.
An entire festival devoted to rhubarb, given my love for the stuff, was a ridiculously exciting prospect. If you're wondering how you can build an entire festival around a single, generally quite underrated, ingredient, you'd have been surprised at the rather substantial scale of the Wakefield festival. Upon closer inspection it turned out to be more of a general food festival with most stalls offering something rhubarb-themed, but there was still a prominent vein of rhubarb mania running throughout the whole thing.

There were cheese stalls offering Wensleydale cheeses with rhubarb pieces in. Chocolatiers proffering bars of rhubarb crumble chocolate. Cafés offering rhubarb and white chocolate pots in addition to their usual cakes. Butchers with pork and rhubarb sausages, or rhubarb pork pies. Rhubarb and custard fudge. Myriad manifestations of rhubarb jam and chutney, and an excellent rhubarb and orange marmalade. There were delicious rhubarb cordials, cakes and tarts.
There were also, of course, stalls selling gigantic bundles of hot-pink Wakefield rhubarb. I don't think I've ever seen so much in one place. Predictably, I gathered three huge bunches to hoard in the freezer. I also ended up with my very own rhubarb plant, which sent up a little pink, green-tipped stalk about a week ago and rendered me unfeasibly excited (I normally kill pretty much every vegetation I touch). I can't wait to harvest it next year and feast on my own home-grown rhubarb.

One of the highlights, though, was a small sip of rhubarb vodka that passed my lips just close enough to 12pm for it to be legitimate and not reminiscent of desperate alcoholism. Given that the day was freezing, the fiery warmth as it slid down my oesophagus would probably have been welcome no matter how it tasted. But on top of that, oh, was it delicious.
Sometimes it's hard to pick up on the distinct and unique flavour of rhubarb. We so often mask it with sugar and cover it in buttery crumble, nuts or custard that its qualities tend to get a little lost. This vodka was wonderful in that the pure rhubarb flavour came through - that delicious fragrance, a slight hint of vanilla sweetness. It was like delicious rhubarb nectar, and dangerously drinkable.

Having braved the realm of homemade infused alcohols a couple of years ago with my very successful (and equally dangerously drinkable) sloe gin, I decided to have a go at making rhubarb vodka at home. Any excuse to buy more rhubarb is a worthy one, in my world. I'm trying to think of the last time I didn't spend a trip to town with at least half a kilo of pink stalks sticking out of my rucksack, and I'm not sure I can. Soon they will start calling me 'rhubarb girl' and try to pour custard on me.
There don't seem to be many definitive recipes for rhubarb vodka online. Some say to only use a couple of sticks of rhubarb, others (most) suggest more, around half a kilo. They generally agree on a 2:1 rhubarb:sugar ratio. Some add orange peel, lemon peel, cloves, cinnamon sticks or ginger. I thought about adding a vanilla pod, because I reckon that could be insanely delicious.
However, for my first attempt, I wanted to keep it pure and simple - just rhubarb, vodka and sugar. If I feel it needs improving, I might try a rhubarb/ginger or a rhubarb/vanilla version next year. I didn't want to complicate things with spices, as I think they would be too intrusive. Cinnamon and rhubarb don't work that well together, in my book - not as well as ginger or vanilla, anyway.

So here is one of the simplest recipes you'll find on this blog. It's one of those simple recipes whose text belies quite how enjoyable and rewarding it is. I spent a lovely relaxed Sunday morning chopping beautiful candy-coloured rhubarb into chunks, then smashing it satisfyingly in a pestle and mortar. I loved the crunch and crush of the pieces as they shattered into pink and white shards, the way they started to release juice that then combined with the sugar in the jar to turn frosty and almost sparkly.
The crushed rhubarb went into a big Kilner jar, and I poured over the sugar, shaking the jar to let the sugar permeate into all those lovely cracks in the rhubarb pieces, turning the whole lot into a garishly pink mass reminiscent of a small girl's bedroom decor. Crushing the rhubarb first means there's more surface area for its aroma and flavour to infuse the vodka, and it also helps the sugar combine with the fruit. Plus, it looks so pretty.
Next, I poured an entire bottle of vodka into the jar. I haven't bought a bottle of vodka ever in my life, I don't think. In fact, I don't think I've drunk vodka since I was actually legally able to. I was almost embarrassed at its presence on the conveyor belt at Morrisons, especially as I was buying very little else so it looked like I was on a strange diet of strong spirits, mints and dried cranberries.

But there was a certain satisfaction in tipping that entire vessel of clear, potent liquid over my beautiful frosty sugared rhubarb mass, knowing that in a few weeks time the whole lot will have coalesced into stunning, hot-pink, sugary, warming deliciousness.
If you decide to make this, try and make it using early season pink rhubarb, rather than the thicker, woodier, greener stuff from later in the year. You'll need to be patient, as it needs to mature for a few weeks - at least three months, preferably. However, if it tastes anything like the stuff I tried at the festival, you're in for a treat. Try it served in small shots after dinner, or combine with cranberry juice and a squeeze of lime for a sort-of rhubarb cosmopolitan. It's also, reportedly, very good in a bellini, topped up with prosecco, though perhaps only if you can handle the inevitable hangover. My alcohol expertise ends there, really, as I don't drink much, but I'm sure more experienced mixologists will find exciting uses for this.
Meanwhile, it's still sitting on my kitchen table. I know I need to move it to a cool, dark place, but the sight of it is just so cheering and uplifting that I can barely bring myself to part with it.

Rhubarb vodka (makes 750ml):
- 500g rhubarb
- 250g granulated sugar
- 750ml vodka
Cut the rhubarb into 2cm pieces. In batches, crush it roughly in a pestle and mortar, and place in a large, clean airtight jar (I used a 2-litre Kilner jar). Add the sugar and shake to combine. Pour over the vodka, clip on the lid, then shake well.
Leave in a cool, dark place, shaking the jar daily, for at least 3 weeks. After 3 weeks you can shake the jar less frequently, about once a week.
When ready to drink (patience is a virtue - it will be at its best after at least 3 months), strain the vodka through a fine sieve or muslin, then bottle.

Rhubarb, cardamom and orange crumble
Rhubarb is nature's way of saying 'cheer up, it's not that bad'.
And my goodness, don't we need it at this time of year. As if the early onset of darkness in the afternoon weren't enough, in the past month the weather here in Yorkshire has decided to throw everything it's got at us. First there was the swift depositing of four inches of snow in a pristine blanket across the city, which but a few hours later had turned to the most revolting Dickensian slush, soaking into my boots and leaving them covered in meandering white salt stains. Then there was the torrential rain only a day later, which mercifully washed away the snow almost as quickly as it had descended. Then there was the gale, which raged for three days and managed, in its ferocity, to move my dustbin a good five metres down the road, to the extent that I thought my neighbours had stolen it. Then the torrential rain returned and this time combined with the gale, to result in the kind of rainfall that makes you abandon all hope of cycling and enables you to justify taking a taxi for 'safety reasons'.

Ridiculous meteorological events aside, it's definitely been a gloomy couple of weeks. The afterglow of a wonderful break skiing in the Alps for my birthday has subsided, leaving me with no vestige of that happy time other than a right toe the colour of a ripe plum and a big toenail that is soon to part company with it. While this is perhaps specific only to me, and not a general January/February gripe, it cannot be denied that these two months are a cruel period in the calendar. You're probably forcing yourself to stick to some awful diet, or abstaining from alcohol, or starting a new fitness regime, or other ludicrous forms of self-torture. Judging by how eerily empty my gym has been over the last couple of weeks, I'm guessing you're not doing too well.
This is why I always think everyone should have cooking as their hobby. It brings you so many opportunities for joy that you'd otherwise lack in your life. I can't count the number of times my entire day has been improved by the find of some beautiful ingredient in the supermarket, the stumbling-upon of some unexpected bargain, or the prospect of cooking a much-anticipated recipe for dinner that evening. I used to be a bit embarrassed by this, but then I realised that I'm lucky. I have little moments of excitement and enjoyment pretty much every day because of my cooking, and I dread to think what a pit of miserable despair my life would be without those. It would be permanently February.

Few things cheer me up more, food-wise, than the sight of beautiful new season Yorkshire rhubarb. This is the real thing, the good stuff. The total antithesis of anything you ever ate at school. The opposite of what people think of when they say 'I hate rhubarb'. The season seemed to start early this year - these slender barbie-coloured stalks were in the shops before the Christmas decorations even came down. They are thinner, sweeter, more tender and of course more beautiful than the rhubarb you get later in the year, which is perfectly fine but isn't going to win any beauty contests.
Now that I live in Yorkshire, I'm surrounded by this wonderful ingredient, and it seems rude not to take full advantage. I've already gone through over a kilo this week alone, making an appearance at the market on several occasions with my arms haphazardly cradling stalks and stalks of it, the hot pink stems sticking out of my bike basket on the way home and attracting several second glances from passers by. Seeing as York is mostly grey right now, rhubarb stands out.

February, month of sadness, is not the time to be going wild with experimentation in the kitchen. It's a time when you want a metaphorical hug from a recipe you just know is going to deliver. You just want to chop a few times, throw something in a dish, spend a minute or two performing the soothing rubbing of cold butter into powdery flour and the stirring in of sugar, oats and spice, then let the oven work away to bring you happiness.
For even more happiness, I recommend watching through the oven door as the fruit juices bubble up lusciously around the sandy crumble crust in glossy, vivid bubbles, oozing stickily between the cracks in the buttery rubble, staining the outside of your baking dish with promises of sugary deliciousness.

So yes, this is a good old-fashioned rhubarb crumble. Those stunning pink stalks get tossed with sugar then smothered with a blanket of flour, butter, oats, almonds and sugar. There's a slight twist, though, in that I've added cardamom and orange to the crumble mixture. Crushed cardamom seeds, because their slight citrussy fragrance and exotic perfume works very well with rhubarb (and indeed with most fruits, I think) and also with anything buttery and crunchy. Orange peel powder, to impart a subtle orange richness without the overpowering acidity of zest or juice - rhubarb is quite tart as it is.
I also added a little ground ginger, because its warmth is lovely with rhubarb - and let's face it, we all need a bit more warmth in our lives right now.

Rhubarb, cardamom and orange crumble (serves 4-6):
- 500g rhubarb, cut into 1.5 inch pieces
- 4-5 tbsp caster sugar (depending on how tart you like your rhubarb)
- 160g wholemeal flour
- 80g cold butter, cubed
- 80g demerara sugar
- 8 cardamom pods, husks removed and seeds ground in a pestle and mortar
- 2 tsp orange peel powder
- 1/2 tsp ground ginger
- 50g jumbo oats
- 50g flaked almonds
- 2 tbsp cold water
Toss the rhubarb and caster sugar together in a baking dish. Pre-heat the oven to 180C.
Put the flour in a large mixing bowl and rub in the butter with your fingers until the mixture resembles fine breadcrumbs. Stir in the demerara sugar, cardamom, orange peel powder, ginger, oats and half the flaked almonds. Stir in the cold water to make the mixture turn slightly 'pebbly'.
Spread the crumble gently over the top of the rhubarb and scatter over the remaining flaked almonds. Bake for 30-40 minutes until the crumble is golden and crunchy.
Lamb, rhubarb and cardamom khoresh

This was almost a culinary disaster.
Well, as close to a culinary disaster as I ever really get. I've never dropped anything on the floor rendering it totally ruined. I've never burnt anything. I've never accidentally smashed glass into a dessert (though my mother has). I've never curdled mayonnaise (largely because I've never tried to make it, but still), collapsed a souffle, made something involving gelatin that has failed to set or accidentally used salt instead of sugar.
I have, however: sliced off part of my finger on a mandolin; spent the night weeping in agony over chilli burns; hideously overcooked a beautiful joint of beef that I was planning to serve medium rare; attempted to make gnocchi and ended up with a sieve full of watery mashed potato; put contact lenses in too soon after handling chilli; added water to melted chocolate resulting in a grainy mess...
...and nearly made this stew into something totally, mouth-puckeringly inedible.

The recipe was one with unknown provenance: it was hastily jotted down from a magazine article during a waitressing shift about five years ago. The identity of the magazine in question has long escaped me, but I must have liked the sound of this recipe because I'd taken the time to stop serving customers their morning coffee and furtively dart down behind the counter to pilfer the recipe contents of the weekend supplements. This was when I was just starting to get into food, when I'd finally worked my way out of the 'only-eating-cottage-cheese-sandwiches-and-fish-fingers' phase and consequently was obsessed with trying out new flavour combinations.
This passion has stuck, and the idea of combining lamb and rhubarb still seems as wonderful to me now as it did back then.
How is this not a more common pairing? For something so ubiquitous at this time of year, rhubarb is sorely underused in most British kitchens. It's common in crumbles and prevalent in pies, but its savoury applications are somewhat ignored. Serving it with mackerel has become more of a normal idea, but is still one that might strike some people as a bit wacky. Serving it with fatty cuts of meat like pork belly seems to be a relatively new concept, yet it is one that works so well. If you think about it, it makes just as much sense as pork and apple sauce: using that astringent fruity foil to cut through the richness of the meat. Apples, rhubarb - both interchangeable in their ability to be sharp, colourful and intensely British.
Rather like myself, I like to think.
Er...right.
Anyway, apparently the notion of a lamb and rhubarb stew is of Persian origin, where they use rhubarb like a vegetable in savoury cooking. Hence the word 'khoresh', which is a Persian stew often flavoured liberally with saffron and using various meats and vegetables.
Don't get me started on how much sexier the word 'Persian' is than 'Iranian'.

So, I finally decided to have a go at the lamb and rhubarb khoresh recipe jotted down on a scrap of paper in my recipe journal, seeing as rhubarb is everywhere at the moment and there's a limit to how many crumbles I can eat without expanding wildly. My recipe was a bit vague in places - perhaps a customer had come along during those moments demanding my barista services - but I changed a few things anyway, seeing as I have a total inability to directly follow a recipe these days.
The near-disaster occurred as a result of such a humble little thing: a lemon. My recipe clearly stated to add the juice of a lemon. Sceptical about this, I added the juice of half before putting the lamb on to braise for a couple of hours. Upon tasting it, it was rather too rich and fatty for my liking, so I added the juice of the other half, then the rhubarb. Big mistake.
I don't know if it was because my lemon was on the large side, or because rhubarb is obviously quite sour anyway and I hadn't factored that in, but on my next taste the khoresh was unpleasantly sour. I was prepared to overlook it, as I quite like tangy flavours, but the look on my mum's face as she tested it made it clear that immediate action would have to be taken. She looked like I'd just made her eat a lemon. Pure and unadulterated. A lamby lemon.
Salt, pepper, brown sugar and honey all worked to no avail. It still tasted...of lemon juice. Not of lamb. Or of rhubarb. Or of onions, stock or saffron. Just of lemon juice. Far too sharp and too sour.

What on earth to do? Adding other ingredients hadn't worked. I know what to do if a dish is too salty - you add lemon juice (!) or a raw potato to soak up the salt. I know what to do if it's too sweet - add salt or citrus. But if it's too sour? I had no idea, convinced sugar would work but sorely disappointed and still being grimaced at by a mother with a face like one of the Nazgul from Lord of the Rings. (Because of the sourness, I mean, not because that's what my mum looks like normally).
But you know what I did, like an utter genius? I went on the internet. I found out that you should add bicarbonate of soda to dishes that are too acidic.
Suddenly, GCSE Chemistry came flooding back. Of course, acid plus alkali equals a neutralisation reaction.
And also a bloody exciting mini volcano.
My stew erupted as I stirred in a bit of bicarb, frothing madly and developing a curious fishy smell that had me terrified for a second but quickly disappeared. Once it had subsided, I discovered to my delight and amazement that the sourness was gone. In its place was a pleasant deep, lamby flavour with a slight fruity tang from lemon and rhubarb.
I added fresh mint to lift the dish and give it a lovely vibrant edge. I scattered over toasted flaked almonds to give an earthy note that would counteract the still-rather-tangy sauce. I served it on a bed of rice which I'd boiled with a few crushed cardamom pods. The sauce was flavoured with saffron, ground coriander and more cardamom (my own idea, because it goes so well with rhubarb), with simple sliced caramelised onions to give it depth.
After its lucky rescue, this turned out beautifully. It's a bit like a classic Moroccan lamb tagine, but the use of rhubarb makes it really unusual. It lends a welcome bite to the otherwise very rich sauce, and is the perfect sharp foil for the earthy lamb chunks, which just fall apart under your fork due to the slow cooking. The subtle use of spice, especially the cardamom, give the sauce an intriguing flavour, and the garnish of fresh mint and almonds is the perfect complement to the whole thing.
Don't be sceptical - it really works, and provided you don't overdo the lemon (I've only suggested half in the recipe below, and if you go for it too much you can always rely on the trusty bicarb), it will be a triumph of exotic and unusual flavours.

Lamb, rhubarb and cardamom khoresh (serves 4-5):
- 1kg diced lamb (neck or shoulder is best)
- Olive or rapeseed oil
- 3 onions, sliced
- 1 tsp ground coriander
- Salt and pepper
- 600ml lamb or chicken stock
- A large bunch of fresh mint, shredded
- A generous pinch of saffron
- 3 cardamom pods, crushed
- Juice of half a lemon
- 400g rhubarb, cut into 1-inch lengths
- Toasted flaked almonds, to serve
- Rice, to serve
Heat a little oil in a heavy-based casserole with a lid. Brown the lamb in batches over a high heat, then remove and turn the heat down a little. Fry the onions in the lamb fat until softened and golden. Add the coriander and a little seasoning. Return the lamb to the pan and add the stock, half the mint, the saffron, cardamom and lemon juice. Cover and cook on a very low heat for 2 hours.
After 2 hours, remove the lid and simmer for 20-30 minutes to reduce the sauce (you could use cornflour or arrowroot to thicken if you like a thicker sauce). After this time, add the rhubarb and cook for 10 minutes or so until it softens (if you like, add some right at the last minute so it keeps its shape - for presentation purposes only, it makes no difference to the flavour) Check the seasoning - it might need more salt or pepper.
Serve the khoresh over plain or cardamom-infused white rice, with the remaining mint sprinkled over the top along with the toasted almonds.
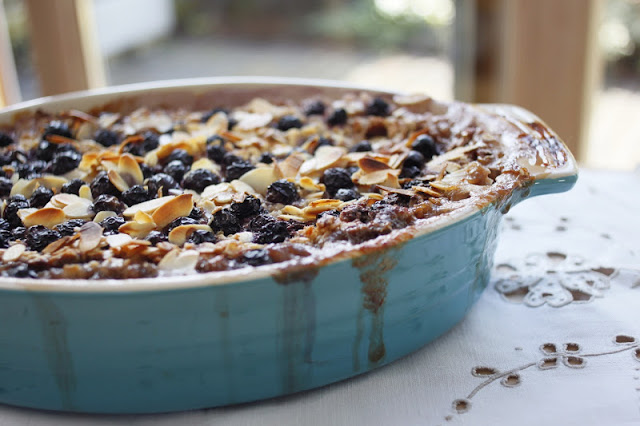
Rhubarb, blueberry and almond baked oatmeal
(...or, "look, crumble for breakfast - but it's healthy!")
Sometimes I think that recipes shouldn't be allowed to tell you how many people they're supposed to serve. I wonder who those portion-control fascists are, that believe they have the right to dictate to us exactly how much of a glorious pan of food we are legitimately allowed to dole out to ourselves and devour with a clear conscience. I wonder why we allow ourselves to trundle on in this Nineteen Eighty-Four style existence, nonchalantly turning a blind eye as the food police worm their way into all aspects of our lives. No longer are we allowed to eat one of those big packs of sushi for lunch; no, the packaging tells us "One serving = half a pack" and then proceeds to blare out those guilt-inducing red and orange traffic light symbols that mean we couldn't enjoy scoffing a whole pack even if we tried, because those garish warning colours are now forever imprinted on our retinas, basically indicating that a single mouthful of the other half of the packet will send our blood sodium levels skyrocketing into stroke-inducing territory, and our arteries to immediately clog with lipids and refuse to let anything important - like blood - past.

Perhaps that's a bit extreme, but I do have a point, I think. Recipe serving guidelines are totally arbitrary, given that it's impossible for them to cater to the hugely diverse variation of appetites in our population. One of those packs of gnocchi you can buy in the chilled section of the supermarket ostensibly serves three or four; I once lived with a boy for whom it was merely a component of his lunch (the others being bacon and pesto).
My biggest irritation comes from those recipes that make wildly outrageous and vague claims like "serves 4-6". What does that EVEN MEAN? "Serves six normal people but four MASSIVE BLOATERS - if you only get four portions out of this luscious lasagne or sizzling stew, prepare to feel really crap about yourself, fatty"?
Yet I have to admit that I, too, conform to the pressure to tell the world how many people one of my (utterly fabulous) recipes will serve.
And I'm ashamed to admit it, readers, but...
...sometimes I lie.

For example, my recent rhubarb crumble cheesecake. Incredible. Astounding. A work of pure creative genius. In a moment of mendacity I had the nerve to tell you that it serves six. Except this is a purely hypothetical and an estimate totally lacking in any factual foundation, because the first time I made it, I ate over a quarter by myself.
So should I assume that all my readers share my rampant and sometimes indecent desire for that luscious menage à trois of cream cheese, rhubarb, and buttery crumble, and tell them that the cake serves four? Or should I - as I did - realise that I'm generally the exception to the rule and can cram far more dessert down my oesophagus than any normal human being should, and therefore give my serving estimate with that in mind?
The perils of recipe writing.

But really, there is nothing more disheartening than picking up a nice lunch-to-go from the chiller aisle of a supermarket (well yes, that is disheartening in itself, but read on for what's even worse), thinking it looks just right, size-wise, for the current black hole of starvation you're feeling in the pit of your stomach, and then seeing "serves 2" on the packet, or the nutrition information for "One serving (half a pack)". Firstly, is this just some sick ploy to make us all even more obese? Because I'm pretty sure no one in their right mind is likely to eat half a sandwich or salad or box of sushi for lunch and be able to leave the rest sitting on their desk or in the office fridge without it plaguing them, haunting them, and eventually driving them to crippling, dribbling despair that results in them clawing their way across the office floor with sweat pouring from their ears as they try to resist the repellent force-field around said lunch item that forbids them eating the whole thing.
The same goes for puddings. I picked up a lovely-looking sticky toffee pudding in Tesco the other day. Rustic. Gooey. Vaguely home-made looking, though that was clearly just clever marketing and it had actually been lovingly created by the mechanical hands of a piece of factory equipment. In China. It was packaged in one of those foil trays with a cardboard lid, like you get for takeaways. Thinking it'd be just perfect for me and the boyfriend, I was about to put it in the basket.
I should have done. Should have just done it. Got it over with. Thrown it in the basket and never looked back.
But for some reason I glanced at the packaging (one thing you must never do: look at the nutrition information for a sticky toffee pudding), and lo and behold, there it was. The dreaded words.
"Serves four".
Yeah, I thought. Four people who really hate life. Four children, maybe. Or four birds.

I had to put it back. As much as I'm trying to resist the tyranny of the serving guideline fascists, I realised in that sad and sticky moment that I am their slave. They will always rule me. Always make me feel guilty about the sizeable amount I'm able - no, scratch that - I need to eat for lunch. Always make me cringe at the capacity of my stomach to squirrel away anything combining butter and sugar in very uncouth amounts. I hate them.
Anyway, you're probably wondering where this rather vitriolic diatribe came from. The reason I began this post in this way is that the recipe I'm going to tell you about today, by the wonderful Heidi Swanson (writer of the superb blog 101 Cookbooks and author of the inspirational cookbook Super Natural Every Day), has inflicted on me a similar sensation of unpleasant gluttonous guilt. The reason being that under the recipe I am going to tell you about, she writes these ominous words: "Serves 6 generously, or 12 as part of a larger brunch spread".
I can eat the whole thing in three helpings.
Which makes me equivalent, in stomach-expansion terms, to either two or four people.
Which makes me, quite frankly, disgusting.
I can't help it.
This recipe is utterly incredible.
For good reason, it's become a widespread food blog classic, frequently popping up in different guises on the internet; I'd wager a large proportion of all the bloggers out there have given it a go at some point, either in its original form or adding some variation of their own. Heidi Swanson is a genius; I always marvel at the originality and creative flair of her recipes, and this is a case in point. It's simple but totally addictive and wonderful.

The original recipe uses bananas, sliced and used to line a baking dish, over which you scatter blueberries and then a mixture of oats, nuts, cinnamon, sugar (or maple syrup), salt and baking powder. Over this you pour another mixture of milk, egg, melted butter and vanilla extract. After a final scattering of more nuts and blueberries, it's ready to bake (salivating yet?). In the heat of the oven, the milk soaks through the oats and makes them moist and tender underneath, while the top sets to a crispy, crunchy crust. The juice from the fruit bubbles up around the crust, leaving those classic gooey, sweet, crispy edges so beloved of things like crumble, cobbler and pie.
It's basically a crumble, but without the flour or (most of) the butter. Soft, sweet fruit; crunchy nuts; gooey, chewy topping. I've made the banana and blueberry version three times now. Heidi's original recipe suggests walnuts, but I much prefer to make it with pecans, which are one of my favourite nuts and work so well with bananas. Walnuts I find a bit too bitter.

Anyway, this is unbelievable. You'd never have thought such a simple idea could be so divine. I'd heartily recommend the banana and blueberry version, but I had a load of lovely Yorkshire rhubarb lying around so decided to try a version with that instead. I swapped the pecans for almonds, the vanilla extract for almond extract, and the bananas for chunky pink sticks of rhubarb. These softened in the oven, releasing their tart-sweet juice and perfuming their coating of oats with its syrupy goodness.
I guess the reason this dish has won such a devout following is that it's basically a template for your mind and your stomach to run wild with. Change the fruits; change the nuts; change the vanilla to something else. Its basic make-up is something that cannot be beaten, an irresistible contrast in textures and flavours. Above all, it's wonderful breakfast or brunch food, designed to set you up for the day and still be healthy while tasting decadently like dessert. It also reheats well, so if you want to make it for just you (do it! DO IT!), you can keep it in the fridge and warm up portions in the microwave. It's actually even better after a couple of days, when all the flavours have mingled together.
So I'm sorry, Heidi, but I really do question your suggestion that this could serve up to twelve people. It's just too damn good.

Rhubarb, blueberry and almond baked oatmeal (serves...er.....I'll go with four big breakfast fans)
(Adapted from 'Super Natural Every Day', by Heidi Swanson)
- 400g rhubarb, cut into 1-inch lengths
- 4 tbsp vanilla sugar (or caster sugar)
- 200g blueberries
- 200g rolled or 'jumbo' oats (not instant oats)
- 60g almonds, roughly chopped
- 60g brown sugar
- 1 tsp baking powder
- 1.5 tsp ground cinnamon
- 1/2 tsp salt
- 475ml milk
- 1 large egg
- 3 tbsp melted butter
- 2 tsp almond extract
- 3 tbsp flaked almonds
Pre-heat the oven to 190C. Butter an 8in x 8in baking dish, or a similar-sized dish (I use a small Le Creuset one). Scatter the rhubarb over the bottom and toss to coat in the vanilla/caster sugar. Add half the blueberries. [If making the banana version of this dish, omit the sugar - rhubarb needs it because it's quite sour, but banana doesn't].
Mix together the oats, chopped almonds, sugar, baking powder, cinnamon and salt.
In a large jug, whisk together the melted butter, milk, egg and almond extract.
Sprinkle the oat mixture on top of the rhubarb and spread out so it forms a fairly even layer. Pour the milk mixture evenly over the oats, and give the dish a couple of bashes on the worktop to make sure the milk is evenly distributed. Sprinkle over the rest of the blueberries and the flaked almonds.
Bake for 40 minutes or until the oat mixture has set and turned crunchy on top. Leave to cool for 5 minutes before serving.

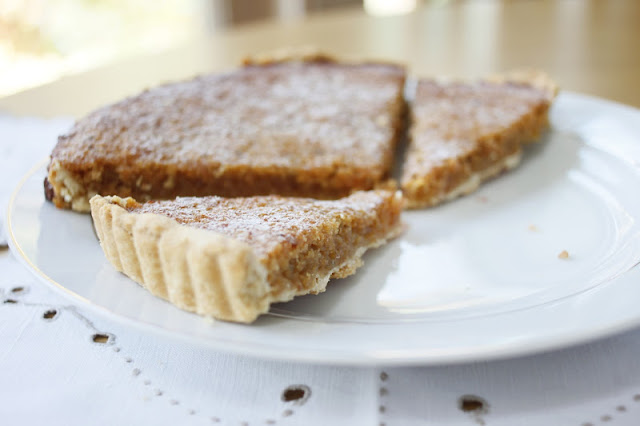
Cardamom treacle tart with poached rhubarb

Now, I'm a firm believer in not messing around with the classics. The saddest thing I have ever eaten was a 'deconstructed rhubarb cheesecake'. I had actually awaited it with great anticipation. Quite naturally, I thought this 'deconstructed' business would essentially mean 'more biscuit base', so I was definitely game for that. In fact, I was basically imagining a huge bowl full of biscuits mixed with butter, and maybe some creamy concoction alongside. There may have been a bit of salivation occurring.
Imagine my utter horror when I was presented with a shotglass full of rhubarb juice, and another containing a bland white creamy substance with a few stray biscuit crumbs strewn across the top.
I feed the birds in my garden more crumbs than that.

It was utterly, utterly vile. It must have been, because I am still sickened by it eighteen months later, and I told everyone who would listen (i.e. no one) for weeks after the dinner about my horrifying experience.
If you are going to deconstruct something as wonderful as cheesecake, why in heaven's name would you take the BEST BITS and diminish them? Cheesecake should not be presented in a shotglass. The clue is in the name: cake is something that, generally, does not often find itself encased in glass. A bit like...oh yes, cheese. Cheese is also something that should not be found in this sorry state.
A few weeks ago, Tom from Masterchef tried to present a 'deconstructed lemon tart'. It was met with widespread condemnation and ridicule, drawing such comments as "it looks like he made a lemon tart then dropped it on the floor". In fact, I don't understand how it could have looked like it did without being dropped on the floor. Does 'deconstructed' translate as 'poorly and unsubtly rescued'?
Or just 'guaranteed to dismay'?

I once watched Raymond Blanc, my husband-to-be (apparently he's also quite good at cooking and some people have heard of him) make a deconstructed crumble on his Kitchen Secrets show. It is a mark of how strongly I feel about deconstructed desserts (and about crumble) that even this wonderful man could not tempt me with his bowl full of summer fruits topped with a circular biscuity thing.
That, my friends, is not crumble. Crumble is not a biscuit. Crumble is like a biscuit that you've taken a sledgehammer to, and then baked. On fruit. So it oozes up sumptuous sticky juice around the edges. Bubbling voluptuously. Calling out to be eaten with a scoop of ice cream. Begging to be returned to for seconds, and possibly thirds, and then that thing that I like to call 'fourths' that is generally best eaten with a teaspoon, straight from the pot, pan or dish, after the meal has ostensibly finished and you're just 'clearing up'. With your mouth.
The gist of all this being that classics are classics for a reason. They're awesome. Don't mess with them. Don't put cake in a glass. Don't try and make geometric art out of a crumble. Don't drop your lemon tart and then add some weird coulis and other rubbish to make up for it.
But then what do I go and do?
I put cardamom in a treacle tart.
Except I didn't put the tart in a glass. I didn't drop it, nor did I cut it out into a circle. I left it well alone. Apart from that teeny tiny little addition, I stuck with the classic.
And oh, my god. I can't understand why no one has ever done this before.
My thought process for this recipe was as follows:
I really, really, bloody want a piece of treacle tart. Like, now. Sticky and oozing and gooey and dentally suicidal and cringeworthily full of golden syrup. Ooh, I made breadcrumbs the other day and stashed them in the freezer. Definitely an excuse to make a treacle tart - frugality is my middle name. Oh no, wait, it's Frances. Close enough. I also have some awesome rhubarb in the fridge. I reckon they'd go really well together - the sharpness of the rhubarb will cut through that intense syrupy sweetness and also look very pretty on the plate. Hmm...what else could I add? I like to think in trios of flavours, for neatness. Rhubarb and cardamom go well. Would cardamom work in the tart? It could either be sublime or a total failure. But then if you think about it, some of the sweetest desserts and pastries I can think of, namely baklava and other syrup-drenched Middle Eastern sweets, use cardamom liberally, and that combination of intense sugar and citrussy spice is heavenly. Surely it should work. We will see. Time to buy a whole tin of golden syrup, empty it into a bowl of breadcrumbs, add some eggs, put the whole lot in a pastry case, then ring my dentist and arrange for either a filling or false teeth depending on how much of this tart I eat.

I love the look and feel of a treacle tart fresh out of the oven. It's gorgeously golden and satisfyingly spongy, with a lovely burnished rim of caramelised sugar around the edge. It's rustic in the extreme and promises total joy with every mouthful. I would like to sleep on it, occasionally rolling over and taking small bites to soothe me when I have nightmares.
It's also catastrophically bad for you, seeing as it contains an entire can of golden syrup. But you're hardly going to be eating it every day, so who cares. Embrace the syrup. Not literally - it's a nightmare to clean. My camera is covered in the stuff. As, probably, is the lining of my stomach.
Anyway, my gamble paid off. This is the best treacle tart I've ever had.
The addition of cardamom is, I have to say, a stroke of genius. Plus I scoured the internet and I've never seen cardamom added to a treacle tart before, so dare I even venture that this might be an original idea?
Surely not. But I like to dream, so humour me.
It's sticky and sweet, but the filling doesn't adhere to your teeth because of the eggs beaten into it, which keep it light and almost fluffy. There's the juice of a lemon which, coupled with the citrussy, fragrant cardamom lifts the whole thing into that gorgeous sweet-slightly sour territory that is just so addictive. The pastry is light, crumbly and buttery, balancing everything perfectly.
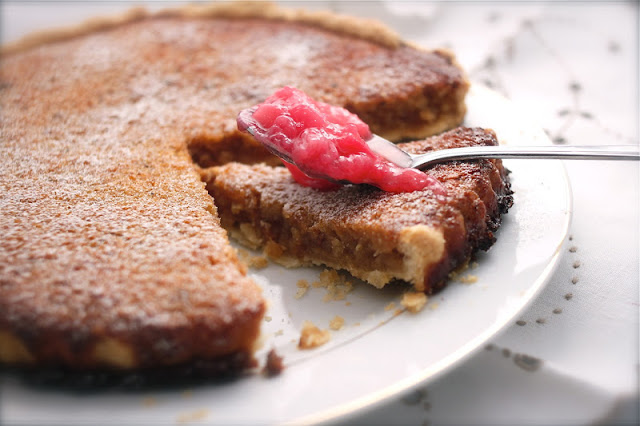
Add some poached rhubarb on top (not, I should add, served from a shot glass) for a sweet tang and a contrast in texture, and you have one of the best desserts I've ever made, or even eaten for that matter. You don't have to include the rhubarb - the tart on its own is incredible and is perfect eaten with some cold cold vanilla ice cream to counteract its chewy sweetness.
Seriously, I cannot get over how good a treacle tart is with cardamom in it. I want to make it again, just to check I wasn't hallucinating and that it is actually as amazing as I think it is. Actually no, I want to make it again so I can eat the entire thing. It's reminiscent of all those syrupy Middle Eastern pastries, but even better.
I'm a firm believer in not messing with the classics...with this small and sublime exception. At least I didn't drop it and put it back on the plate.

Cardamom treacle tart with poached rhubarb (serves 8):
(Adapted from a BBC recipe here)
- 225g plain flour
- 110g very cold butter, cubed
- Cold water
- 450g can golden syrup
- 90g fresh breadcrumbs
- 2 eggs, beaten
- Zest and juice of 1 lemon
- 1 heaped tsp ground ginger
- 10 cardamom pods, seeds crushed and ground to a powder
- 200g rhubarb
- 4 tbsp caster sugar
First, make the pastry. Blitz the flour and butter together in a blender (or rub together with your fingertips) until it resembles fine breadcrumbs. Add the cold water, 1 tbsp at a time, until the dough just comes together. Tip out onto a floured work surface, form into a ball, then roll out to a thickness of 0.5cm. Line a 23cm tart tin with the pastry, letting it overhang the edges a little (you can trim them after cooking - it'll shrink otherwise). Chill for 30 minutes in the fridge.
Pre-heat the oven to 190C. Prick the bottom of the pastry case with a fork and line with greaseproof paper. Fill with baking beans/dried pulses to weigh it down, then bake for 15 minutes until turning golden. Remove the beans and paper and bake for another 5-10 mins until crispy.
For the filling, mix together the syrup, breadcrumbs, eggs, lemon juice, ginger and cardamom. Pour into the case then bake for 30 minutes until golden and slightly brown around the edges. Leave to cool before dusting with icing sugar.
For the rhubarb, slice it into 1-inch lengths and place in a small pan with the sugar and a tiny splash of water. Simmer until it just starts to disintegrate. Check the sugar - you might want a little more if your rhubarb is very acidic.
To serve, slice the tart using a very sharp knife, spoon over a little of the rhubarb compote, and serve with vanilla ice cream.
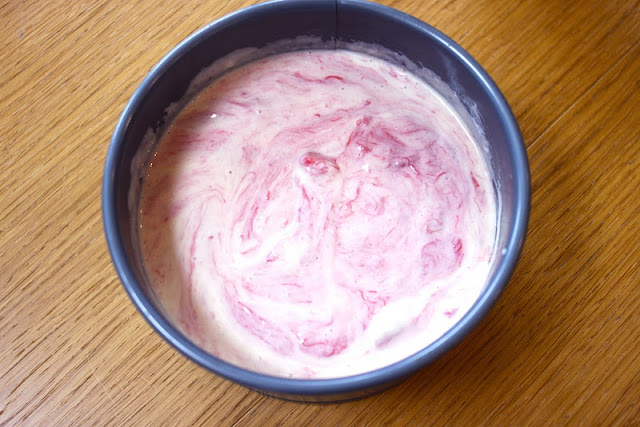
Rhubarb and ginger crumble cheesecake
This recipe was featured on ITV's Food Glorious Food in April 2013. I adapted the recipe slightly for the show to make a bigger, taller cake, so have updated this post with the latest version of the recipe (which can also be found in the Food Glorious Food cookbook). I hope you enjoy recreating it in your own kitchen!

Yes, my dear readers. I have gone and taken two of the best desserts in existence , and combined them into one luscious, creamy, buttery, crunchy creation.
I've been wanting to make this dessert since approximately April last year, when I froze the end of the season rhubarb with the express intention of doing just that. You know the stuff - those gorgeous pink stems, such a bright and vibrant fuschia they seem almost unnatural, quite unlike anything that could possibly have sprung up from the dark, dank earth. Sadly those colours don't last - as the season progresses, those stems progressively widen, darken, become stringy and sour. Still delicious, doused in a liberal coating of snowy white sugar, but best quietly hidden beneath a mound of buttery crumble or a blanket of pastry.
I froze the bright pink stuff to use in a dessert that would really allow its colour and natural sweetness to shine. Something pure and white to exaggerate its naturally beautiful qualities. I envisaged swirling it into a simple vanilla cheesecake batter, removing my finished creation from the oven or fridge to reveal a beautiful marriage of pink and cream curled lovingly around each other. Where the idea for the crumble topping came from, I don't know.
Oh wait, I do know. Plain common sense. Why would you NOT put a crumble topping on something?
I literally cannot think of any arguments against it.

I imagined breaking through that delicious buttery crust to reveal the yielding, creamy centre of a cheesecake rippled with tangy, sweet rhubarb. Not only would it taste wonderful, but the colours would be beautiful - the contrast of the snowy white cream against the hot pink fruit, mellowed by the pleasingly muted hue of the cheesecake base and the crumble topping.
I can't believe it took me nearly a year to get round to making this a reality.
This is just one version of a whole range of possibilities based on this theme. I chose to make a baked cheesecake, because I thought the slightly denser filling would marry better with the thick crumble topping - crunchy crumble on top of a quivering, gelatinous mousse didn't seem quite right, somehow.

I made a basic cheesecake mixture with ricotta, creme fraiche, eggs and sugar, adding quite a lot of vanilla because I love vanilla with rhubarb. I roasted the rhubarb in the oven with some sugar, mashed it with a fork to make a compote, then swirled this into the cream. It was spooned over a delightful crunchy ginger nut base (I make my cheesecake bases approximately two times more thick than is normal, because why wouldn't you add more butter and biscuit than required?) and topped with a simple crumble topping.
I say simple...I added some chopped almonds for crunch and used wholemeal flour and brown sugar for a more pronounced flavour, as well as a little ground ginger to complement the rhubarb and the biscuit base. I have to say, this was a great idea - wholemeal flour and brown sugar give it a much stronger 'crumbly' flavour - you can really taste the difference. I think I'll start making all my crumble in this way from now on. Plus you can even kid yourself it's healthy as it's wholemeal (that is how it works, right?)
I wasn't really sure when to put the crumble mixture on top of the cheesecake - too early and it would sink down into the cream cheese and end up ruining everything...too late and the cheesecake would overcook in the time it took the crumble to brown. In the end I removed the cake just over halfway through the cooking time, sprinkled on the crumble and put it back in (quickly, so that it didn't sink).

Somehow (I call it cook's intuition...some, however, may just call it luck), I timed it perfectly. The crumble cooked through to a rich, golden brown, oozing bubbling caramel juices down the side of the tin. The cake was creamy, fluffy and light but held its shape.
Until I tried to cut it, that is. It's quite hard to slice through thick crumble while not making a mess of the yielding mass of cream and fruit underneath...but it's not impossible. Use a serrated knife. No one will care once they taste this.
I was thrilled with how this cake turned out. You end up with something that is part pie, part crumble, part cheesecake. The rhubarb infuses into the cream cheese mixture, turning it a delightful pastel pink colour and lending it a tangy, fruity edge that pairs so well with the mild, sweet vanilla. Then you have the utterly satisfying crunch of the biscuit base followed by the gorgeous crunchy crumble. It's almost like eating rhubarb crumble with cream on the side, but all in one mouthful and with added biscuit.
And what on earth is not to like about that?

Rhubarb and ginger crumble cheesecake (serves 8):
- 400g rhubarb, cut into 2½cm lengths
- 4 tbsp water
- 50g caster sugar
- 1 drop red food colouring (optional)*
- 1 tsp arrowroot mixed with 2 tsp cold water
- 375g ricotta cheese
- 300ml half fat crème fraîche
- 1½ tbsp runny honey
- 120g caster sugar
- 3 large eggs
- 1 tsp vanilla extract
For the base:
- 60g butter, melted, plus extra for greasing
- 18 ginger nut biscuits, crushed
- 1 egg white (optional - helps prevent the base going soggy)
- For the crumble topping:
- 80g wholemeal flour
- 40g cold butter, cubed
- 40g demerara sugar
- 1 tsp ground ginger
- 50g blanched almonds, roughly chopped
- 1 tbsp cold water
- Sprigs of mint to decorate (optional)
*The food colouring is useful if you're making this with late season rhubarb (as opposed to early forced rhubarb) which is greeny brown and looks less pretty in the end result. The food colouring helps make it gloriously pink!
1. Preheat the oven to 190°C/375°F/Gas Mark 5. Butter a 20cm (8in) springform cake tin.
2. Put the rhubarb into a baking dish with the sugar and water, toss together and bake for 25–40
minutes, depending on the thickness of the rhubarb, until tender. Remove and leave to cool.
3. Meanwhile, make the base. Melt the butter in a small saucepan, then mix in the biscuits. Tip the
mixture into the prepared tin and press it down evenly with the back of a spoon. Brush with the
egg white (if using) and bake for 10 minutes, until golden and firm. Set aside to cool.
4. Mash the cooked rhubarb to a purée with a fork. Drain well, then add the food colouring (if using).
Pour in the arrowroot mixture and stir to thicken. Set aside to cool.
5. Put the ricotta, crème fraîche, honey, sugar, eggs and vanilla extract in a blender or food processor and whiz until combined. Transfer to a bowl and swirl the rhubarb purée through it with a
fork. Don't overmix – the idea is to create pink streaks.
6. Reduce the oven temperature to 180°C/350°F/Gas Mark 4 and put an empty roasting tin in the
bottom of it. Butter the sides of the cake tin again, then pour the cheese mixture over the biscuit base. Cover the tin tightly with foil, then place in the oven and quickly pour a jug of cold water into the empty roasting tin. Close the oven door and bake for 30 minutes.
7. Meanwhile, make the crumble. Put the flour and butter in a bowl and rub together until the mixture resembles fine breadcrumbs. Stir in the sugar, ginger and almonds, then gently stir in the water to form small ‘pebbles’ in the mixture.
8. Remove the cheesecake from the oven, discard the foil and spread the crumble mixture over the top of the cake. Remove the tray of water from the oven and increase the temperature to 190°C/375°F/Gas Mark 5. Bake the cheesecake for a further 30 minutes, until a skewer inserted in the middle comes out clean. Set aside until cool, then refrigerate until needed. Remember to bring it back to room temperature 30 minutes before serving: no one wants cold crumble! Decorate with mint sprigs if desired.

Five things I love this week #3
There's a definite autumnal feel to my 'five things' this week; that much is evident from the muted beige tones of these photos. After a wonderfully warm October, I think I'm finally ready to embrace the onset of autumn, and all the delicious produce it brings with it.
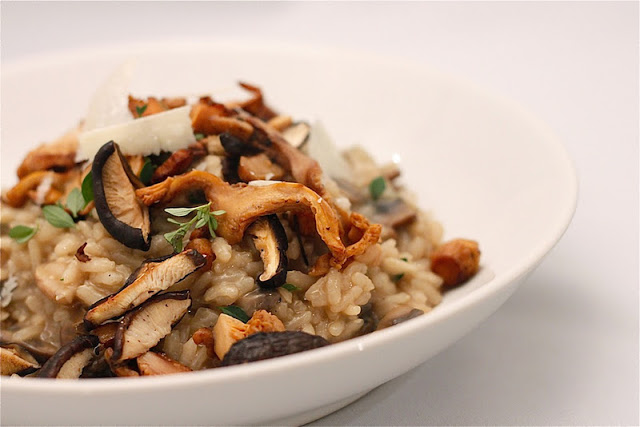
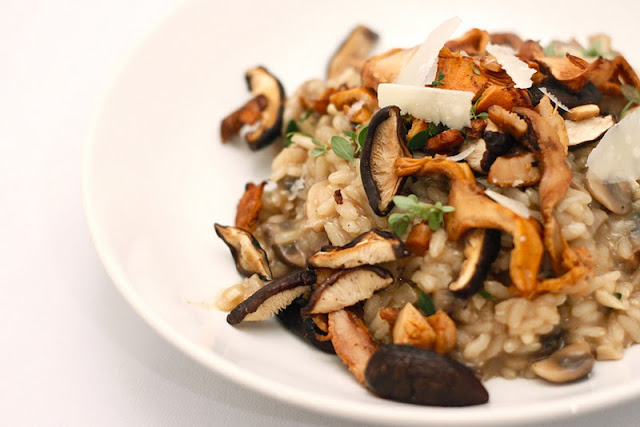
1. Wild mushroom and truffle risotto. I've been craving risotto ever since I had a beautiful starter at the Yorke Arms last week: truffled partridge boudin with ceps and carnaroli rice. The rice was a gorgeous risotto-like concoction, heady with the musky fragrance of truffle, the rice still with a little bite to it, creamy and savoury and incredibly delicious. I couldn't ignore my truffle/risotto cravings any longer, and succumbed with this lovely recipe.
It's a standard risotto to which I added chopped chestnut mushrooms when frying the onion and garlic; I also used soaked porcini mushrooms and added their soaking water to the chicken stock used to plump up the rice. The risotto is finished off with some pan-fried girolle and shiitake mushrooms (shockingly expensive, but a nice little luxury, and so much more interesting to eat and look at than standard mushrooms), a drizzle of truffle oil, lots of lemon thyme leaves and a hefty grating of parmesan. Savoury, umami-rich wonderfulness.
2. Pumpkins and winter squash. It's easy to just pick up the knee-jerk butternut when planning winter squash recipes, but the other day I discovered these beauties at the farmers market. I think the pale blue one is a Crown Prince squash; the others I'm not too sure about.
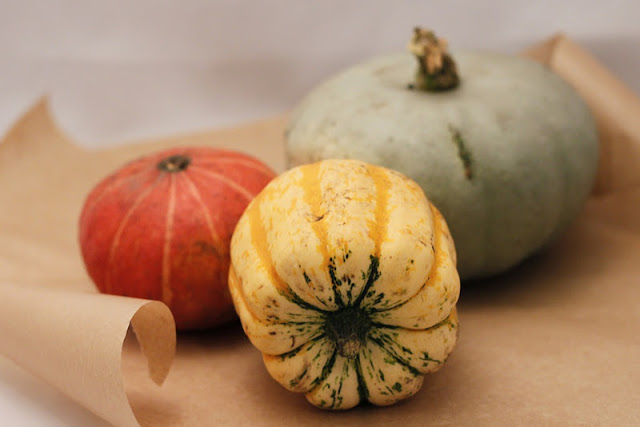
I cut them all into chunks (risking life and limb and a hernia in the process; who needs a gym when you can spend an evening hacking your way through an unyielding orb of orange?) and roasted them with olive oil, salt, pepper and lots of chopped fresh rosemary. They softened into intensely flavoursome, sweet, fudgy deliciousness. Their flesh was much more dense and full-flavoured than your standard butternut squash, while the skin went beautifully dark and caramelly.
I served them alongside roast partridge (recipe to come) and also mixed them with some couscous, feta and cherry tomatoes for a salad. Winter squash are great with anything salty, like bacon, feta or goats cheese. The possibilities are pretty much endless. I'm definitely going to seek out different kinds of squash in future (and perhaps an axe to chop them with).
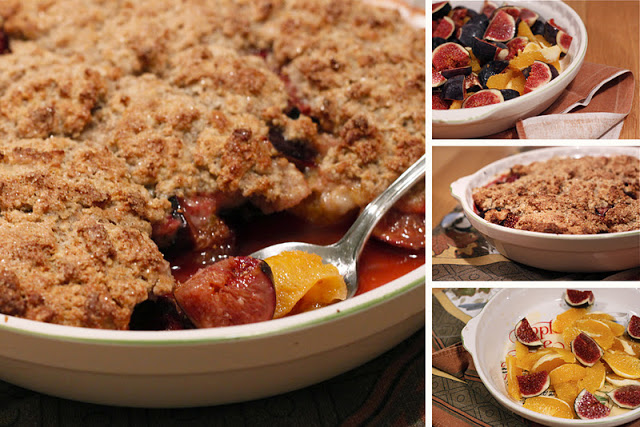
3. Fig and orange cobbler. Figs and oranges are a surprisingly successful combination (my aim this autumn is to discover all possible partners for the wonderful fig - raspberries and oranges are two of my new finds). Mix sliced figs and segmented oranges (about eight figs and two oranges) with a little dark sugar and a splash of rum, orange juice or grand marnier in a pie dish. Dollop on this cobbler topping, then bake for half an hour or so until the fruit releases its beautiful garnet juices and the topping is crisp and crunchy. This also works wonderfully as a crumble, especially if you mix some oats and almonds or hazelnuts into the crumble mixture. The figs soften and the oranges become really sweet and flavoursome, and the combination together is juicy, fragrant and delicious. Add some good vanilla ice cream and devour: autumn in a bowl.
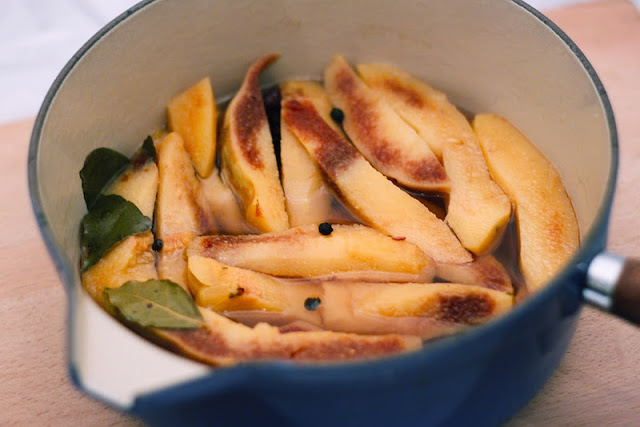
4. Porridge with apple and quince compote. A delicious, unusual and thoroughly seasonal way to start an autumn day. Simply simmer peeled, chopped quince in a little water and lemon juice until almost tender. Don't throw away the cores and peel - simmer those covered in water in a separate pan while you cook the quince. Add a few sliced cooking/Cox apples to the chopped quince (peel if you like - I only bother if they're quite big, otherwise it's too fiddly) and the water from the quince cores and peel, and cook until the apples start to disintegrate. You should have a lovely, pale gold bowl of fragrant goodness. You can add sugar, but I don't think it needs it - quince is sweet enough on its own. This is lovely on hot porridge scattered with a few blackberries.
5. The Great British Food Revival. A brilliant programme all about championing British produce that is in danger of being sidelined by foreign imports, putting us back in touch with our food heritage and urging us to save those traditional ingredients from extinction (think peas, pears, crab, pork, potatoes...). I loved the first series, and the second is just as good, judging from what I've seen so far: Gregg Wallace extolling the virtues of Yorkshire rhubarb, an ingredient very close to my heart and one that I hoard like a mad person during its short season. There's still some in my freezer. He comes up with some unusual and delicious recipes that I can't wait to try.
While on the subject, I love Gregg Wallace. I think he has an honest and immensely refreshing attitude to food. None of this poncing around with silly descriptions about umami, mouthfeel and acidity. He simply says "it's like a hug from the pudding angel". If that isn't a concise and accurate description of a dessert, I don't know what is. He is entirely unpretentious and seems like a genuinely nice, fun person. And I'm not just saying this because he likes rhubarb, though that does win anyone brownie points in my eyes.
I'm also looking forward to seeing Valentine Warner's contribution to the show, mainly because I had lunch with him a couple of months ago and am childish enough to get excited about having met people who appear on TV.
Rhubarb preserves

Astrid from Paulchens Foodblog is hosting Weekend Herb Blogging this week, and once again I am going to go a little crazy over rhubarb. Still struggling to get through the enormous bag of the stuff given to my mum by a friend (the rhubarb and ginger cake made very slight inroads), I decided the most appealing option remaining was to preserve it in some shape or form. It wasn't quite gorgeously pink and slender enough for bottling, so I went down the jam and chutney route. It's been a while since I've made jam or chutney, but I do enjoy the wonderful alchemy of putting a load of apparently disparate ingredients (raisins, vinegar, onions, rhubarb, spices) in a huge pot and stirring away with a giant wooden spoon until they have merged together into a harmonious, spreadable delight. It makes me feel rather like a Victorian housewife.
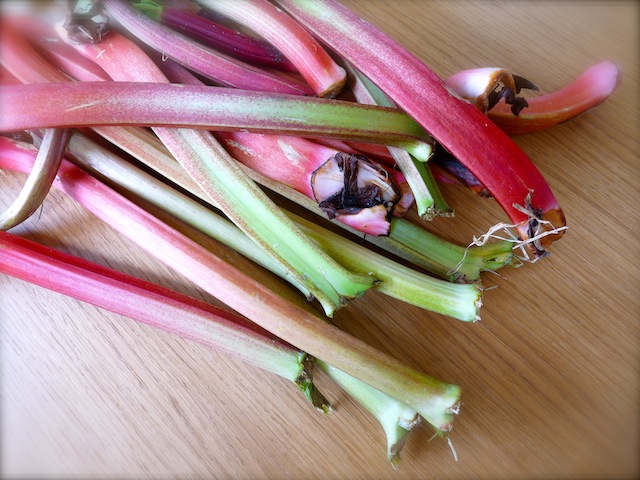
I've never attempted either rhubarb jam or chutney before, but I decided to make both. Largely because I already have so much chutney (people just give it to me as a present - I'm not sure what exactly there is present in my constitution that screams "GIVE ME VINEGARY PRESERVES", but there must be something - not that I'm complaining) that I'm going to need to purchase either an entire pig or a kilo of cheese to go with it, and also because I've just run out of my beloved homemade fig jam and need a substitute. I am doubtful as to whether anything will match the sheer deliciousness of that jam, but surely if anything is going to, it will be rhubarb, one of my favourite ingredients.
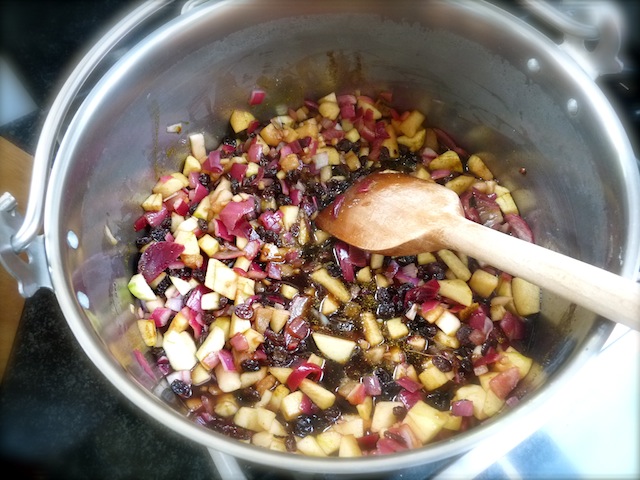
I set about the chutney first, because it takes longer. I wanted ginger in there, for a fiery kick and also for its affinity with rhubarb. I wanted raisins, because I love the way they plump up in a preserve and add a lovely textural contrast. I wanted apple, to add another fruity flavour to the rhubarb, and I wanted brown sugar because I love its caramel notes. In they went, along with copious amounts of red wine vinegar, chopped red onions, rhubarb, salt, and curry powder. Adding curry powder is an idea I picked up from googling chutney recipes - it's easier than adding all your own spices in small amounts, and it adds a great spicy aroma. I would have put mustard seeds in there too, convinced we had a small bag of them in the larder - I had seen them before recently, and could visualise their location - except neither I nor my mum could find them anywhere. We practically dismantled the larder in search, but they were nowhere to be found, and now I am convinced I am losing my mind. You know you're too obsessed with food when you start hallucinating mustard seeds.
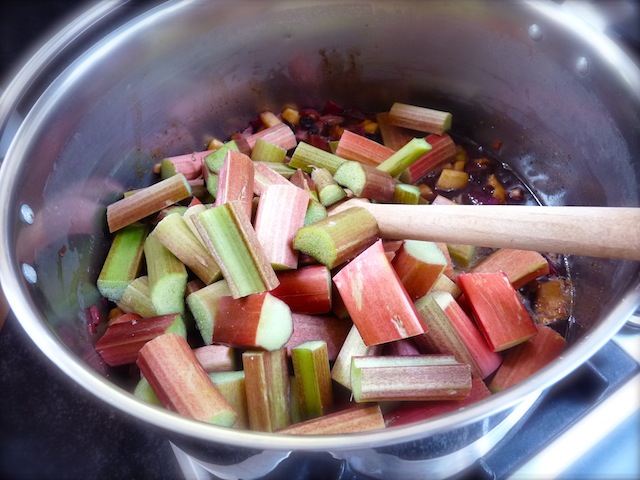
I let all of that bubble away happily, and set about making jam. Again, I used fresh ginger, and also the juice and zest of two oranges. I also put some ground ginger in there too, for extra heat, a lot of sugar, the rhubarb, and the juice of a lemon to help it set and to take the edge off all the sugar. Neither the jam nor the chutney looked the most appetising of things when they were finished, being rather brown and stringy, but it's all about the flavour, and the jam I tested was very nice. I haven't tried the chutney, as I need to let it mature for three months first, but it smelled rather delicious. I felt an immense sense of satisfaction as I spooned the finished preserves into their little jars, sealed them, and labelled them. My inner home economist is placated, and now all I need is to make a loaf of bread to eat the jam with.
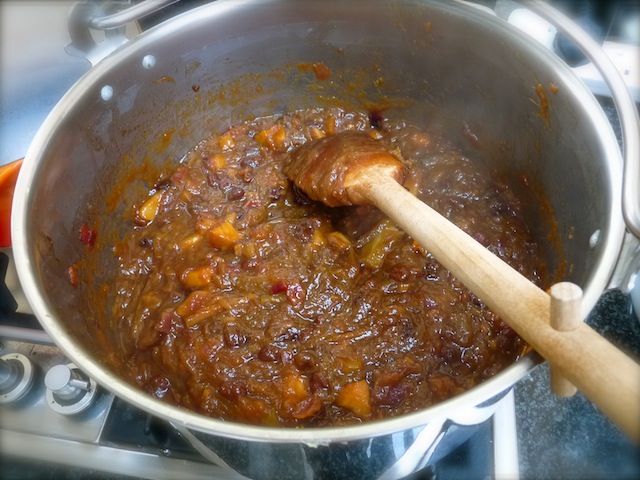
I bottled this jam and chutney in a mixture of Le Parfait and normal jam jars, so I've given roughly the number of normal jam jars it will fill. This depends on your jars, though, so have a selection sterilised and waiting for the finished preserve. If you can only half-fill one, just keep it in the fridge and eat it first!
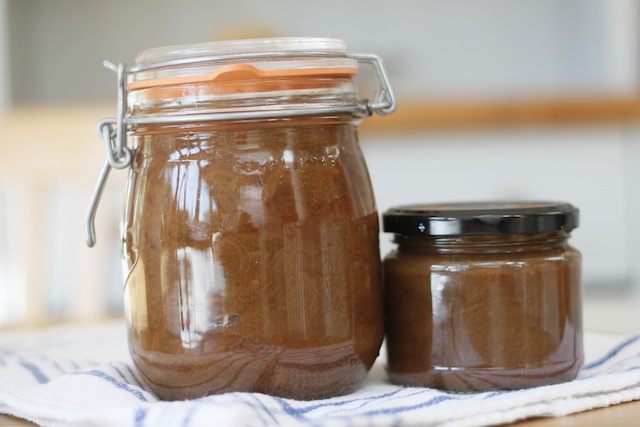
Rhubarb and ginger chutney (makes about 6-7 jars):
1 kg rhubarb, cut into lengths
500g red onions, roughly chopped
4 cooking apples, peeled and roughly chopped
400g raisins
60g fresh ginger, grated or finely chopped
300ml red wine vinegar
1 tbsp curry powder
1 tbsp mustard seeds (if you actually have some, and are not just hallucinating)
2 tsp salt
400g muscovado sugar
Boil the onions, ginger and vinegar for 10 minutes. Add all the remaining ingredients, except the rhubarb, and cook for about 15 minutes until the apples have softened. Stir in the rhubarb, and simmer gently for about an hour, possibly two, until it has all softened and formed a thick brown mass. You should be able to run the spoon down the centre of the pan and leave a momentary gap between the two halves of the mixture.
Pour into hot sterilised jars while the mixture is still very hot, then cover with waxed discs and seal. Leave for at least three months to mature before eating.
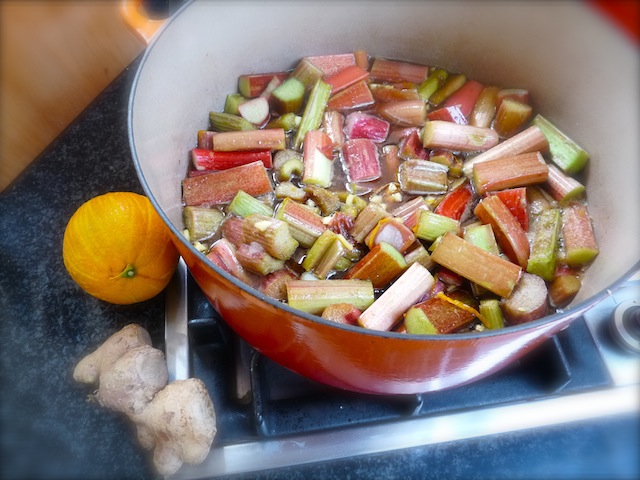
Rhubarb, orange and ginger jam (makes 4-5 jars):
1 kg rhubarb, cut into short lengths
Juice and zest of 2 oranges
50g fresh ginger, grated or finely chopped
1 tsp ground ginger
700g granulated sugar or jam sugar
100g muscovado sugar
Juice of 1 lemon
Place all the ingredients in a large pan and bring to the boil, stirring to make sure the sugar doesn't burn. Lower the heat and simmer gently for an hour or two until the jam has thickened. To test it, put a plate in the fridge until cold, then spoon a little jam on top. Leave for a minute, then run your finger through it - it should wrinkle.
Spoon the hot jam into sterilised jars, cover with wax discs and seal.
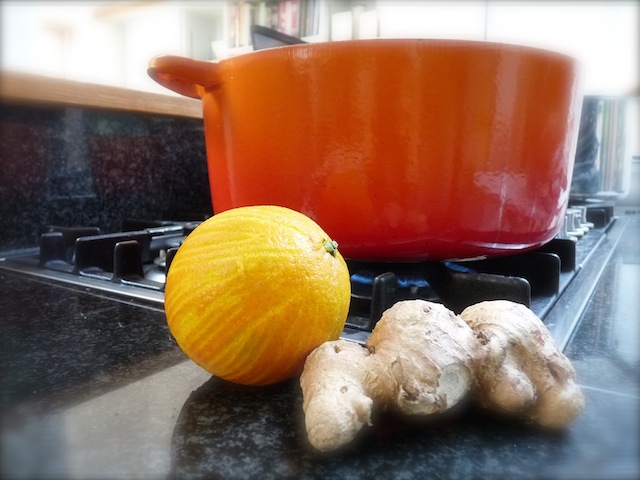
Adventures with a KitchenAid mixer #3: sticky rhubarb cake

I came back from Italy a few days ago to find an enormous bag of rhubarb in our kitchen. Enormous. There must be at least three kilos of the stuff in it. I will spare you my favourite spiel about how much I adore rhubarb and proceed to describe how I turned this back of green and pink stalks into one of the most delicious cakes in existence, with the help - naturally - of my beloved new KitchenAid stand mixer. Because this rhubarb is later in the season, it lacks the slender, elegant pinkness of its champagne cousin, and therefore isn't entirely suitable for a simple poaching or roasting treatment. This cake is a great and pleasantly rustic way to make the most of rhubarb that needs a little more doing to it than a simple scattering of sugar.

First, the cake batter. This is a simple mixture of brown sugar and butter, creamed together before adding yoghurt, eggs, ginger and self-raising flour. I was pretty generous with the ground ginger, because it goes so well with rhubarb and also with brown sugar. I've made this cake once before using sour cream instead of yoghurt, but I decided to try yoghurt because a) the sour cream I found in the fridge was interspersed with thick veins of furry blue mould and b) because yoghurt is a rather healthier substitute and I am still feeling vast after my trip to Italia.
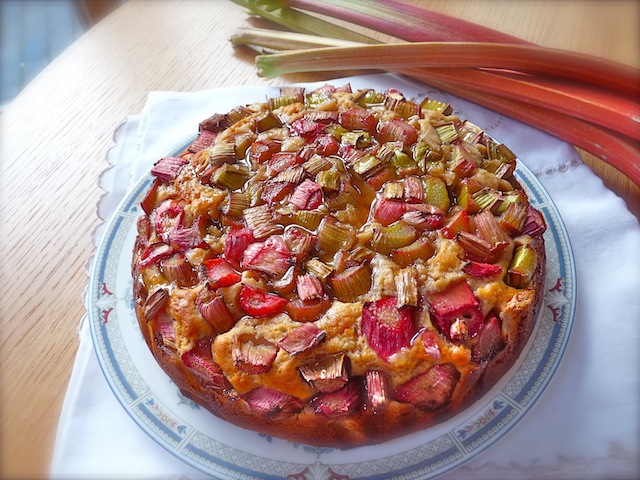
The result is a rather thick batter that smells and tastes incredible. I think it's the tartness of the yoghurt that, coupled with the brown sugar and ginger, provides the most wonderful balance between sweet and sour. It goes into a tin, and then it's time for the rhubarb. Of course, making the batter requires no more effort than putting things into the bowl of the KitchenAid and switching it on. I'm still getting used to having my cakes mixed in a fashion that requires no hands-on effort from me.
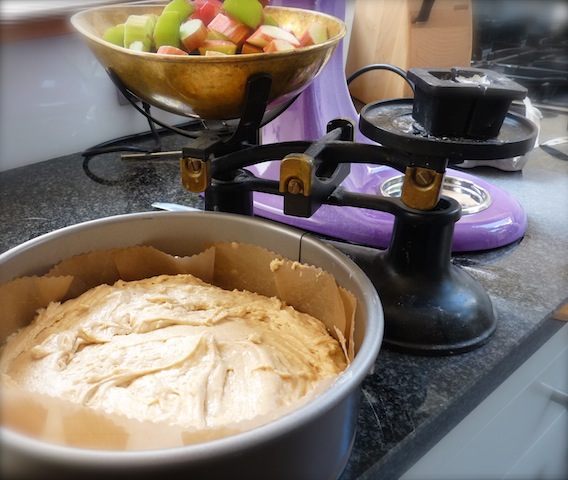
Having been spoiled by early season rhubarb, hacking my way through these rather thicker and tougher stems was a novelty. I nibbled a bit of one out of interest, and it was rather like eating a lemon. I quite like the way this kind of rhubarb is green in some places and pink in others; it's an unusual colour contrast and for some reason reminds me of sticks of rock. Though I have never eaten or in fact closely observed a stick of rock. I sliced the rhubarb into short lengths, and arranged it on top of the cake batter.
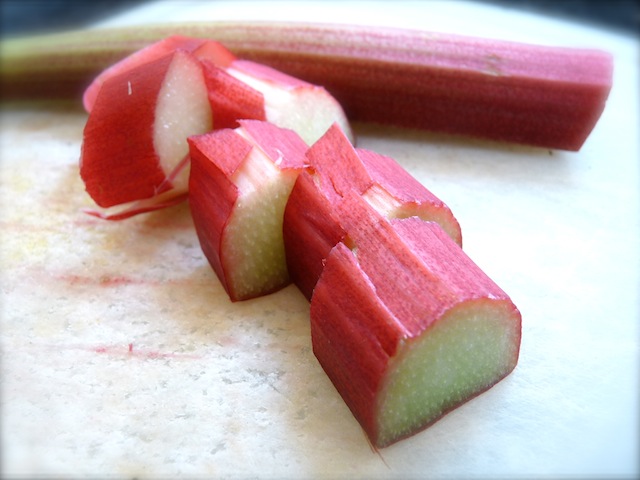
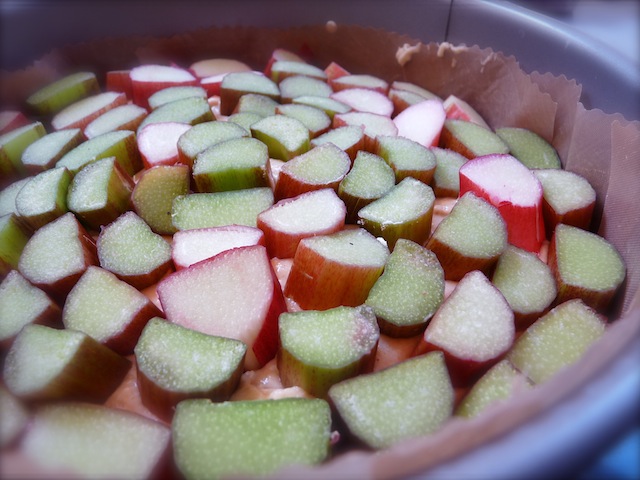
Ginger syrup. Water, sugar and ground ginger boiled until sticky and fragrant. The perfect partner to tart rhubarb, the syrup goes over the top of the cake once it has had a while to cool. I made some holes in the cake before I poured it over, in the style of a lemon drizzle cake. There was a lot of syrup left over, even though I completely drenched the cake in it. It soaks into all the cracks between the rhubarb and the batter, leaving a gorgeous glistening finish and a superbly moist cake. It also seeps into the pieces of rhubarb, softening and sweetening their astringency.

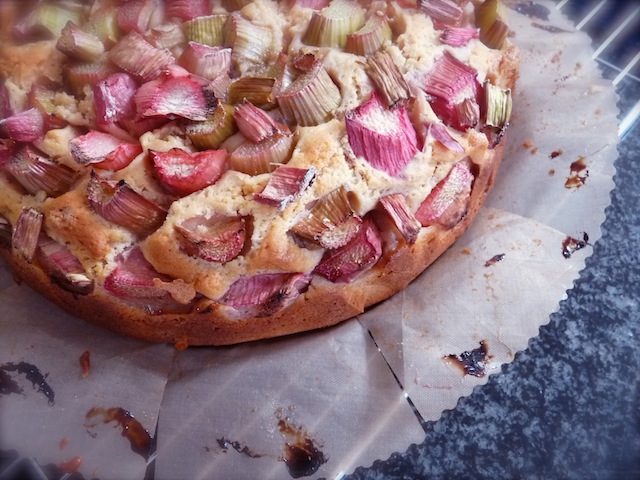
I love the look of this cake; it's very rustic, with its scattering of rhubarb sticking up at odd angles, but also intensely inviting because of the way the syrup shines wickedly over the surface, hinting at promises of sugary goodness to come. Cut into it, and you're rewarded with an incredibly moist crumb with a slight sourness that balances perfectly with the rhubarb and lashings of sugar. The ginger also marries perfectly, preventing over-sweetness. The best part is the top layer where the syrup has soaked down into the cake. Words cannot express just how satisfying and simply delicious this is. Add some vanilla ice cream, and you have dessert heaven. It's best eaten warm but keeps well for a few days too.
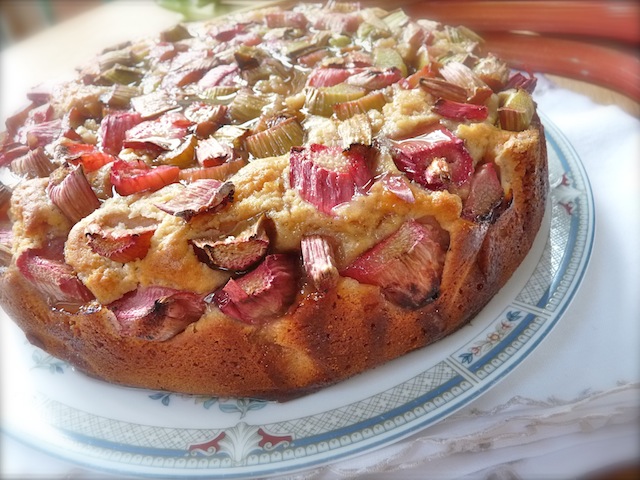
Sticky rhubarb and ginger cake (makes a 22cm cake):
75g butter, softened
250g brown sugar (light or dark - I used light)
300ml natural yoghurt
2 eggs
2 tsp ground ginger
300g self-raising flour
400g rhubarb
100g caster sugar
1 tsp ground ginger
Pre-heat the oven to 180C. Grease and line a 22cm springform cake tin.
Cream the butter and sugar together using an electric mixer. Add the yoghurt, eggs and ginger, and mix well until combined. Fold in the flour - you should have a smooth but fairly stiff batter. Pour the batter into the cake tin.
Chop the rhubarb into short lengths and scatter over the top of the cake, as neatly or as messily as you like.
Place in the oven and bake for an hour and a half. If the top starts to brown too much, cover with foil. Remove and leave to cool.
Make the syrup by mixing the caster sugar and ginger with 100ml water. Bring to the boil and bubble until thickened and syrupy. Use a fork to poke some holes into the cake (try not to go all the way through to the bottom), then drizzle the syrup over.
Serve immediately with creme fraiche, yoghurt, or vanilla ice cream.

Bottled rhubarb
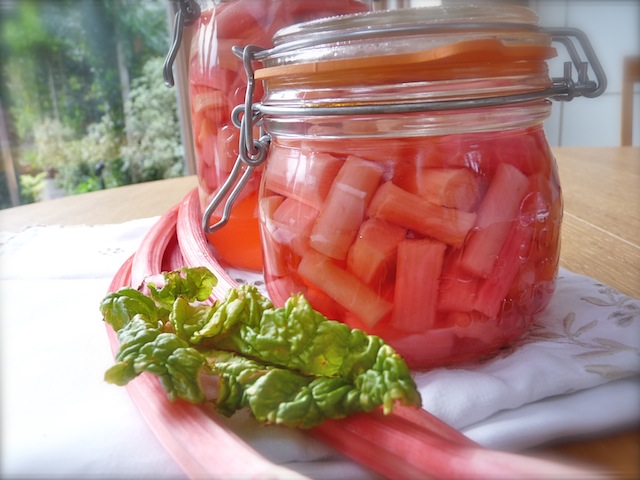
There are some ingredients so beautiful and exciting that they always put a spring in my step on the journey back from the market to my kitchen. Blood oranges are one; really fresh, glistening mackerel is another; gorgeous jade-green, slightly squat Williams pears, with their promise of fragrant, sweet juice; dark aubergines, plump, glossy and black like beetle eyes. But probably my favourite is rhubarb. Spring rhubarb: bright, almost obscenely pink, poking out of my bag like sticks of rock. It's even better when the leaves are still attached: the contrasting bright green and pink is slightly mesmerising. I just love this vegetable, and am always looking for new ways to use it.
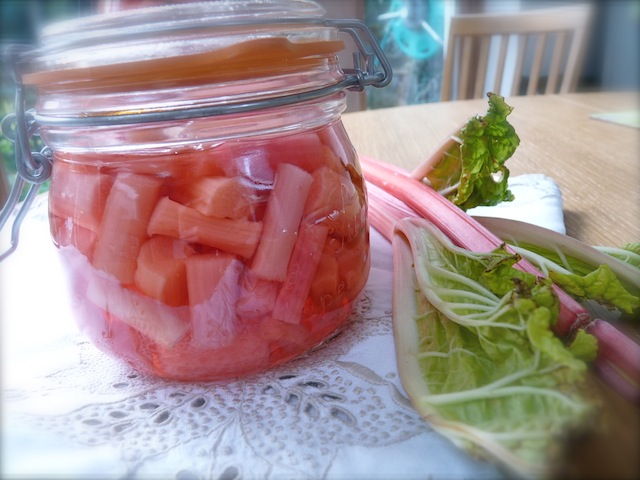
I'm also keen to use it while it's this lovely: as the season goes on, home-grown rhubarb turns tough, dark green, and woody. It needs a lot more sugar, and doesn't have the delicate flavour and colour that works so well in desserts. It's fine hidden under a thick, crumbly pastry crust or a buttery crumble topping, but isn't ideal for topping a snow-white pavlova or mixing into an orange roulade. A couple of weeks ago I bought a kilo of the pink stuff and put it in my freezer, to satisfy any rhubarb cravings that will inevitably arise over the coming months. But when I spied a heap of gorgeous, pale pastel rhubarb at the farmers' market the other day, and realised we have no more space in our freezer at home, I turned to another method of preservation: bottling.
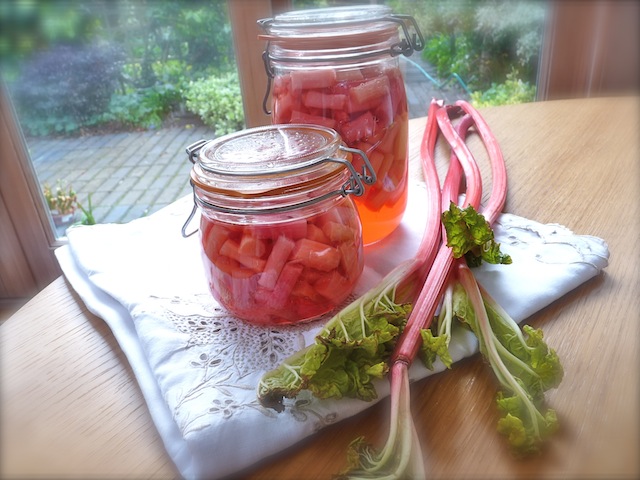
I remembered an article in the Guardian a year or so ago about bottling rhubarb, and needed no further prompting, especially as we have a supply of these beautiful Le Parfait jars at home. I've preserved lemons in them before (great in Moroccan cooking), and they are just too pretty when filled with fruit to sit behind a cupboard door - my preserved lemons sit next to my bed on the windowsill. Ideal if I ever wanted a midnight snack of mouth-puckeringly sour, salty lemon flesh.
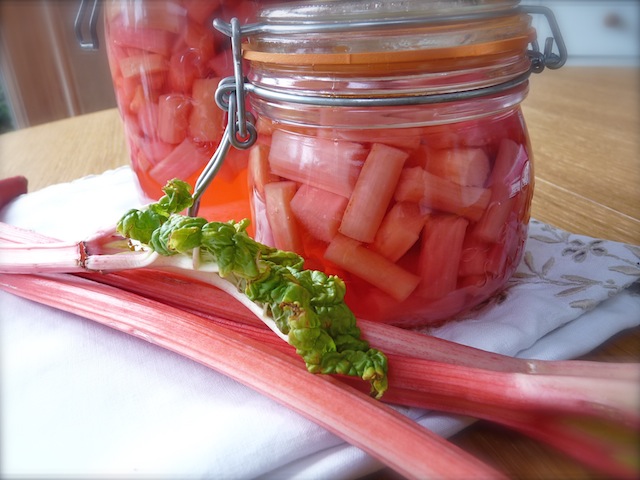
I've also bottled fresh apricots before - they are another ingredient I'm absolutely obsessed with when they're in season. I can't get enough of them: they go on my porridge (simmered into a thick, jammy compote with a cinnamon stick and some dates), on tarts, in pies and crumbles, all through the summer until they disappear and I'm left pining for them. They're one of the few fruits that you can't find all year round in England; unlike plums, they aren't imported all year, usually coming from France or further afield in the summer and then disappearing.
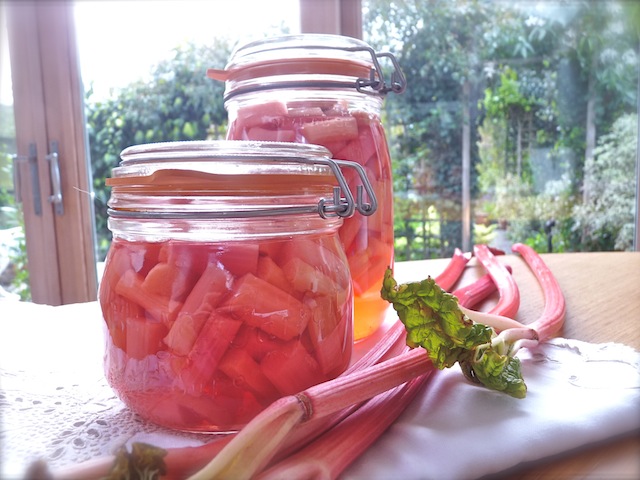
The technique for bottling fruit is simple: make a sugar syrup, then pack the fruit in the jars and pour it over. Then you have to vacuum-seal the jars (see below), but that's it. It is, in my opinion, a better method of preservation than jam-making, because the fruit retains its shape and flavour rather than collapsing into an overly sweet sticky mass. That said, I do love making my own jam and chutney as well, but I usually reserve it for things like apples that are in plentiful supply, rather than treasured rhubarb or apricots.
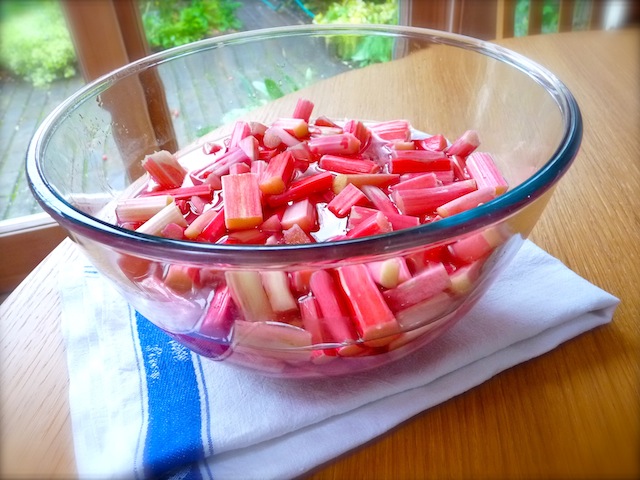
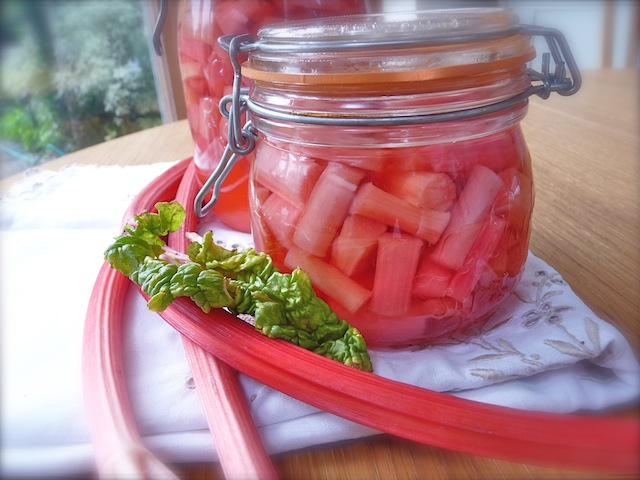
That's it, really: beautiful jars of gorgeous pink rhubarb, ready to extract and use in desserts and compotes whenever you fancy. I'm going to try and wait before opening my first jar, but we'll see how long that resolution lasts. I already have an exciting rhubarb cake in my mind. And how gorgeous do these jars look? They'll make a fine addition to my bedside windowsill, and a much better potential midnight snack than a preserved lemon...
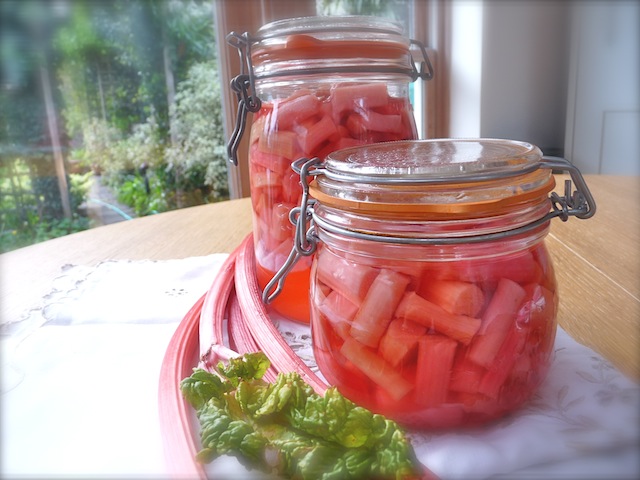
Bottled rhubarb
It's difficult to say how many jars this will fill. Your best bet is to sterilise several jars of different sizes, and use a combination to ensure the rhubarb is tightly packed. Mine filled a 1 litre jar and a 500ml jar. See the Guardian article for tips on sterilising and vacuum-sealing jars: this is the method I used, and it worked perfectly, but you can also use kilner jars. You can also double, triple, or halve the quantities as you wish.
1 kilo spring rhubarb, cut into short lengths
400ml water
180g caster sugar
Le Parfait jars (a total of about 1.5l capacity)
Place the sugar and water in a saucepan and bring to the boil. Bubble away for a few minutes, then pour over the rhubarb. Place in the fridge, covered, and leave to soak overnight.
Sterilise your jars by running them through a dishwasher, or washing in hot, soapy water then placing in the oven at 160C for ten minutes, or boiling for 10 minutes in a large pan. Make sure when you take them out of the oven/pan that you put them down on a chopping board or something - if they go on a cold surface they can crack. Sterilise the rubber rings from the jars by pouring boiling water over them.
Remove the rhubarb from the syrup and pack it tightly into the jars. Bring the syrup to the boil, and pour over the rhubarb so it just about covers it. If you don't have quite enough syrup, top up with boiling water fresh from the kettle.
Close the jars and replace the rubber seals but don't clip them down. Put the oven to 110C and place the jars on a baking sheet with some newspaper underneath in case the contents leak in the oven. Put in the oven and leave for 50 minutes. Remove and clip down the metal clips. Alternatively, you can clip the lids down and place the jars in a large pan lined with a teatowel to stop them moving around and breaking. Cover with water and bring to the boil; boil for a few minutes then turn off the heat and let the jars cool in the water.
The next day, unclip the metal. If the lid stays on and doesn't pop up, the seal has worked.